Thursday, February 25, 2016

Lisa's Granola

Lisas granola 3

You can make your own granola! Yes, you. You can! Let me tell you this....it's a hundred times better than anything you can buy in the store and it's customizable. Make it the way you like it! This recipe is quick, easy, and so much cheater than store bought granola.

There is something to be said about a recipe that you have been making for years and years. I'm lucky enough to have quite a few recipes like this. This granola recipe is one of them.

A friend of mine asked me if my granola recipe was on the blog and I had to stop and think and actually Google myself only to find that, no, it wasn't! I have made this recipe dozens and dozens of times and never blogged it!

I love this granola because it's not too sweet and you can add in just about anything that you'd like. I found some roasted coconut chips at Trader Joe's and they are fantastic in this.

I store this in big gallon mason jars. Nothing says homemade like a mason jar full of food!

Lisas granola

Lisa’s Homemade Granola
Recipe from Lisa@The Cutting Edge of Ordinary
PRINTABLE RECIPE
In a large bowl mix:
4 cups rolled oats (not instant)
1 cup wheat germ
1 cup nuts (walnuts of almonds, whatever nut you like!)
¼ cup brown sugar
1 teaspoon cinnamon
½ teaspoon salt
6 – 8 ounces dried fruit. I just eye the fruit really.
Go wild! Cranberries, dates, coconut, raisin, pineapple, papaya. Anything goes!

Mix together:
1/3 cup vegetable oil
1/3 cup honey
1/3 water

Heat the oven to 300. In a large bowl stir together the oats, wheat germ, nuts, sugar, salt and dried fruit. Mix the oil, honey and water together and pour over oat mixture. Stir to coat. Line a sheet pan with parchment and spread the mixture evenly onto the pan.

Place the granola in the oven and set the timer for 10 minutes. Remove and stir and return to the oven for another 10. Repeat this 2 times. Granola will bake for a total of 40 minutes. Let cool completely and store in glass jar or airtight container. Makes about 7 cups.

Friday, February 19, 2016

Oatmeal Chocolate Chip Cake with Cream Cheese Frosting

Oatmeal Chocolate Chip Cake with Cream Cheese Frosting

I almost forgot about this recipe until someone who actually ate it reminded me about it! (Thanks Marie!). It would have been a darn shame if I didn't share this wonderful recipe with you all!

When you cook and bake as much as I do you are usually the person hosting most get togethers and parties. I'm totally ok with that. I love to cook and bake for my family and friends. I love seeing people enjoy the food that I made, but every once in awhile it is very nice to have someone invite you over and you get to be the person who says "I'll bring dessert!".

My wonderful friend Eva, who took me to more chemo treatments than anyone else, who is always there for me, who is the epitome of kindness and compassion invited us over for dinner a few weeks ago. She is a fantastic cook and makes two things that my husband loves so very much....lumpia and pancit, so we are always happy to share a table with her and her family.

It took me almost a week to decide on what to bring. I usually don't like to bring something that I never made before but this cake sounded so delicious that I thought it was worth a shot. I am so glad that I went out on a limb and made it because boy was it ever delicious!

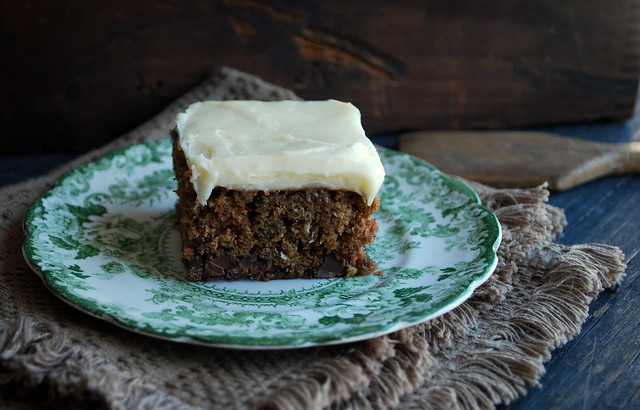
How can I describe it? It's like a cross between a spice cake and a great chocolate chip oatmeal cookie. I omitted the raisins but you can certainly add them in if you'd like.

This cake fed quite a few little ones and they all loved it!

You all know I'm more of a pie person than I am a cake person, but this kind of cake, this cake my friends is worthy of worship. It's that good!

I used coffee instead of the water called for in this recipe. I think that little flavor boost took it over the edge.

Oatmeal Chocolate Chip Cake with Cream Cheese Frosting 1

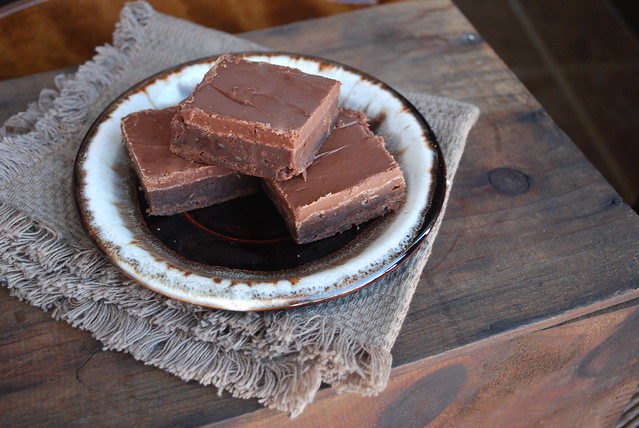
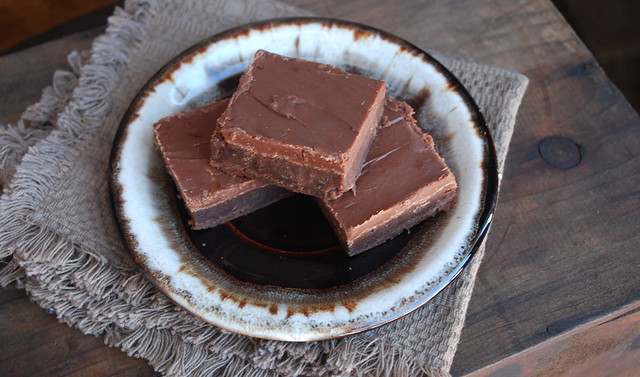
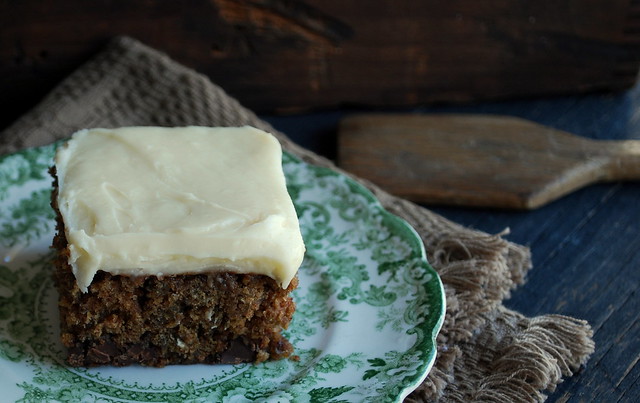
Oatmeal Chocolate Chip Cake with Cream Cheese Frosting.
original recipe from Two Peas in their Pod
PRINTABLE RECIPE
1 1/4 cups water (or strong coffee) - I used coffee!
1 cup chocolate chips
3/4 cup raisins
1 1/2 cups plus 2 tablespoons all-purpose flour
1 cup rolled oats
1 stick unsalted butter, cut into small cubes, at room temperature
2 large eggs, slightly beaten
1 teaspoon vanilla extract
3/4 cup granulated sugar
1 1/4 cups packed dark brown sugar
1/2 teaspoon salt
1 teaspoon baking soda
1 teaspoon baking powder
1 1/2 teaspoons ground cinnamon

For the cream cheese frosting:
5 tablespoons unsalted butter, at room temperature
5 ounces cream cheese, softened
2 cups confectioners’ sugar, sifted
1 teaspoon vanilla extract

Preheat the oven to 375 degrees F. Grease a 9x13 glass or light-colored metal baking pan. Set aside.
Bring the water to a boil. Place the chocolate chips in a small bowl and toss them with the 2 tablespoons of flour. This will keep them from settling at the bottom during baking. Set aside.

Place the oats and butter cubes in a large bowl. Pour the boiling water (or coffee) over the oat mixture, wait 30 seconds, and stir to moisten all the oats and melt the butter. Let the oat mixtures set for 25 to 30 minutes.
In a separate large bowl, whisk together the eggs, vanilla extract, both sugars, salt, baking soda, baking powder, and cinnamon until combined. Fold in the cooled oatmeal and stir until well combined. Gently fold in the remaining flour and then the chocolate chips and raisins if using. Pour the batter into the prepared pan.
Bake the cake for 35-40 minutes, or until a toothpick inserted in the center comes out clean. Let the cake cool on a wire rack until completely cooled.

While the cake is cooling make the cream cheese frosting. In the bowl of a standing mixer fitted with the paddle attachment, beat the butter until it is completely smooth. Add the cream cheese and beat until combined. Add the confectioners’ sugar and vanilla and beat until smooth, about 1 minute.
Frost the cooled the cake with cream cheese frosting. The frosted cake can be kept refrigerated and tightly covered, for up to 3 days. It can be served chilled or at room temperature.

Monday, February 15, 2016

Garlicky Roasted Mushroom - Stuffed mushroom taste without all the fuss!

Garlick Mushrooms 3

I know not everyone is a mushroom lover. You either get a "yum" or a "yuck" from people when you mention mushrooms. I don't think there is too much middle ground when it comes to the fungi.

I love them. I mean I love, love, love them. I pick up at least 2 packages a week and we always use them up.

I especially love baked stuffed mushroom but they do take some time to make. I found this quicker easier way to prepare them and still get that baked stuffed taste without all the fuss. It's a win-win for me!

So if your a mushroom lover quick recipe will fit into your week day meal plan!


Garlick Mushrooms 2

Garlicky Roasted Mushrooms
PRINTABLE RECIPE
16 mushrooms, even sized
3 tablespoons olive oil
2 cloves garlic, finely chopped
3 tablespoons butter, room temp
1 teaspoon parsley
Juice from half a small lemon (about a teaspoon)
6 tablespoons panko breadcrumbs
Salt, pepper


Remove any dirt from the mushrooms with a damp paper towel. Cut the stalks off of each mushroom so it is level with the cap.

Preheat the oven to 400. Put 3 tablespoons of olive oil in a frying pan. Lightly fry the mushrooms, cap side down, in the oil while the oven heats (about 5 minutes). No need to flip them over, you just want them to cook a bit on the bottom. Remove from pan and transfer to paper towel.

In a bowl mix together the butter, garlic, lemon juice and parsley. Season with salt and pepper. Place the mushrooms in an 8x8 baking dish, cap sides down. Top each mushroom with the butter mixture and then sprinkle each one with panko. Bake for 20 minutes or until tender.

Tuesday, February 9, 2016

Bangers and Mash Sausage Rolls

Bangers Mash Rolls

I don't know if it's a fairly new thing but for the past 6 months or so I kept getting these little videos on my Facebook feed from Tasty. There are short instructional videos and I drool over almost all of them.

I started to save them in Facebook. Did you know that you can do that? I had no clue either until someone showed me. So I had a few Tasty videos saved and I would look at them from time to time and this Bangers and Mash video just kept poking me in the side you know. Make me. Make me. I told my hubby about it and he was like "oh yeah, make that". So I did.

It was super easy to throw together. I happened to have had mashed potatoes left over from the previous nights meal so I thought it was the perfect opportunity to throw it together.

I bought big, fat breakfast sausages from my company cafeteria, but you could use a regular Italian sausage if you'd like. My youngest son really loved them and has asked me several time when I'll be making them again. Safe to say these will be in rotation at my house. I made 4 with this recipe, but I'll have to double it next time!

For those of you who haven't heard of Bangers and Mash.....also known as sausages and mash, is a traditional British Isles dish made of mashed potatoes and sausages, the latter of which may consist of a variety of flavored sausage made of pork or beef or a Cumberland sausage. It is sometimes served with onion gravy, fried onions, baked beans, or peas. It is mostly eaten in the United Kingdom, Canada, Australia, and New Zealand.

Shout out to my family of friends across the pond....this one's for you! xoxo


Bangers Mash Roll 2s


Bangers And Mash Sausage Rolls
original recipe from Tasty.
PRINTABLE RECIPE
4 Sausages - I used big fat breakfast sausages, any larger sausage would work.
Mashed Potatoes /cold
1 sheet Puff Pastry /thawed
1 Egg, beaten

Brown the Sausages on all sides in a large skillet - until mostly cooked through. Set aside to cool slightly. Unroll each sheet of puff pastry and cut into 4 pieces. Spread a little mashed potato over each pastry coming withing a half inch from the border of the pastry. Top with cooked sausage and additional mashed potato on top. Roll up each sheet - pinch together to seal and trim off any excess. Place on a greased or parchment lined baking sheet - seam side down - and brush each roll with beaten egg.

Bake in a preheated oven at 375˚F for 25-30 minutes or until the pastry is golden and crispy on all sides and the meat has cooked through.

Thursday, February 4, 2016

Lunch Lady Brownies - or as my guys calls them The Best Brownies Ever!

Lunch Lady Brownies2JPG

Hello lovely blog readers!

I'm still getting back in the swing of things here in Rhode Island. I'm in the middle of radiation and doing very well. I am a bit more tired than usual, but over all I'm feeling good and trying to return to life as normal as much as I can.

A few weeks ago we hosted a little get together for the NFL playoffs. My team (The Patriots) lost, but we had a great time with friends and ate some delicious food together.

No get together would be complete without a sweet at the end right? I went old school and looked online for a brownie recipe. I wanted something fudgy and cakey all at the same time with a great frosting too. That's not too much to ask for is it? I'll admit it, when it comes to brownies, I like them all. I haven't met a brownie that I don't like, but I was aiming for one that had that perfect little chew to it and boy did I find it.

Here is a little background on these amazing brownies from Saltbox House:
This brownie recipe is no ordinary recipe. This recipe was first made in a Jr. High School cafeteria in a small town in Idaho. A lunch lady made these brownie so perfect that they were entered in local bake sales and fund raisers. This recipe has been around for more than 50 years and still attracts so many children each year. I was given this recipe by my aunt who worked in the school cafeteria and knew this wonderful women. These brownies are the best of both worlds. They are cake-like with the chewy density of a cookie. They really are a delicious piece of history!

I think I found my new "go-to" brownie recipe! I omitted the nuts this time because my youngest doesn't like them and requested that I leave them out this time, but next time they are going in.

Lunch Lady Brownies

Lunch Lady Brownies
Original recipe from Bonneville Junior High Cafeteria via Saltbox House.
PRINTABLE RECIPE
2 sticks butter
½ cup unsweetened cocoa
2 cups all-purpose flour
2 cups sugar
4 eggs
4 teaspoons vanilla
1 cup chopped nuts (optional)

For Frosting – make while the brownies bake!
¼ cup softened butter
¼ cup milk
¼ cup unsweetened cocoa
3 cups powdered sugar
Dash salt
Beat all the ingredients together. Frost brownies while still warm.


Melt the butter in the microwave and pour into a mixing bowl. Add the cocoa and mix until smooth. Add the flour and sugar and mix to combine. Add eggs, vanilla and nuts (if you are using). Mix until just combined. Don’t overmix! Pour into a greased and floured 9x13 baking pan. Batter will be thick.

Bake at 350 for 20 to 25 minutes or until cake tests done. Wait 10 minutes to frost the brownies. You want to frost them when they are warm. Let cool before cutting and serving.