Friday, May 31, 2013

CMP Cake


CMP Bars

I'm so behind on everything friends. My blog, house work, oh I can't list anymore or it will just make me depressed.

To top it all off the beautiful spring weather we had been experiencing turned into temps into the 90's with high humidity. Oh thanks. Just what my mop of a head of hair needs.

I'm going to warn you now this post is going to be a mish-mash of rumblings cause I'm just gonna let it all out.

  • We had a long weekend. John and I both took Tuesday off following the holiday to get stuff finalized in the yard. We did get just about everything finished in between running 10 errands. I think I was in and out of my car like 15 times that day. Jesse went to an oral surgeon who has informed us that he needs to have his wisdom teeth out. Thanks, I didn't need that $1,200 anyway.

  • My house is party central for just about every holiday and celebration. Not this year. I finally learned a new word "NO". No I won't be having a big Memorial Day party. No I won't be having a 4th of July party. No I won't be cooking for Mother's Day. It feels kinda good. For once I want to the be person who just brings a dish instead of cooking everything, not to mention the cost and clean up. With Jesse's graduation party fast approaching I decided to pool all my energy into it and not exhaust myself with everything else. That's my story and I'm sticking to it.

  • Bird houses. I'm obsessed. John built me a gigantic triple decker that I spent hours painting. The day before I painted it I visit one of my favorite country stores and saw another bird house. I'm in love with. I don't buy it and as soon as I leave the store I regret it. I just contacted my friend Abby who owes the place and asked her if I could have one made in another color. It's being made for me now. This is my 10th bird house. I'm pitiful.

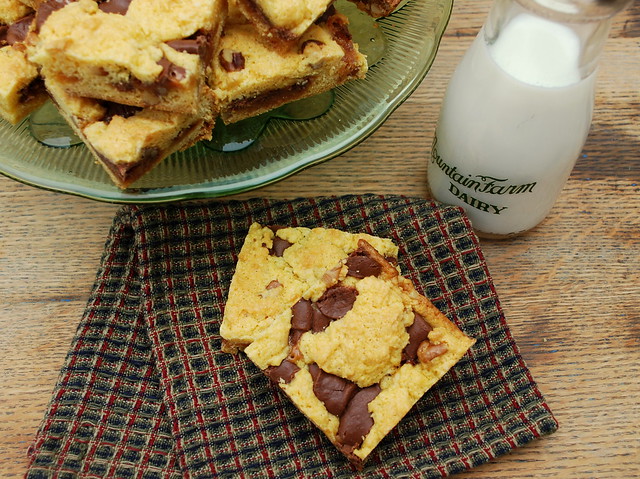
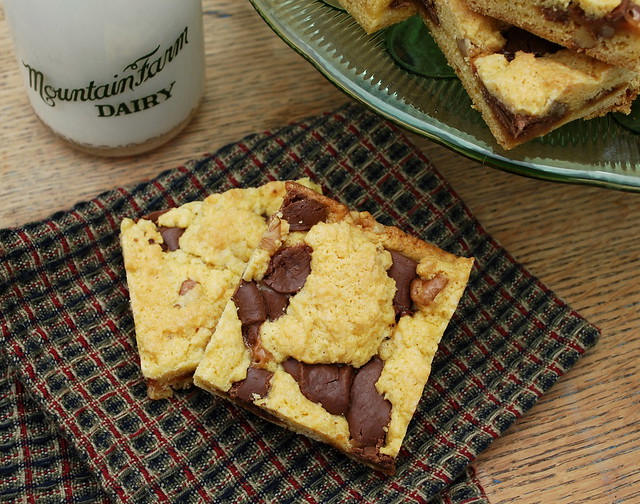
We did have our friends John and Tati over for Memorial Day. The boys stayed home and they only had one friend over so it was almost like not cooking for a party to me.  I had to make a dessert. I just had too.

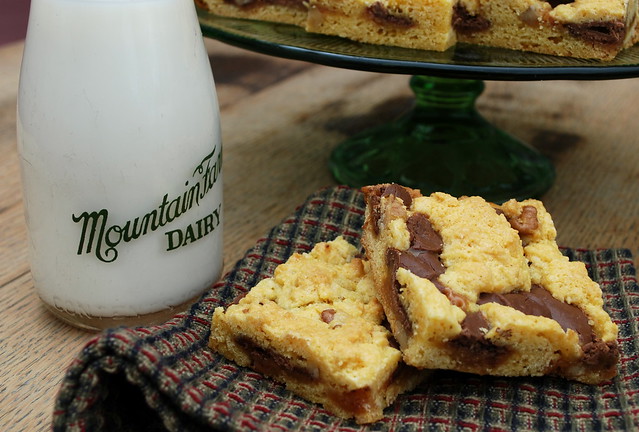
I saw this recipe in an email from QVC. I had just bought these (and I love them!) Little strainers in the containers! It's the little things that make me happy. So anyway the email had a recipe for this cake. The recipe originated in Pennsylvania. Seems there is a famous sundae called a CMP (chocolate, marshmallow and peanuts) and this cake was inspired by that sundae. It got me interested so I looked it over and decided to make it.

It was a hit. Oh and most of you know I'm not a real peanut butter nut. This recipe has a 1/2 a cup of peanut butter in it but it's not too peanut buttery at all.


CMP Bars1


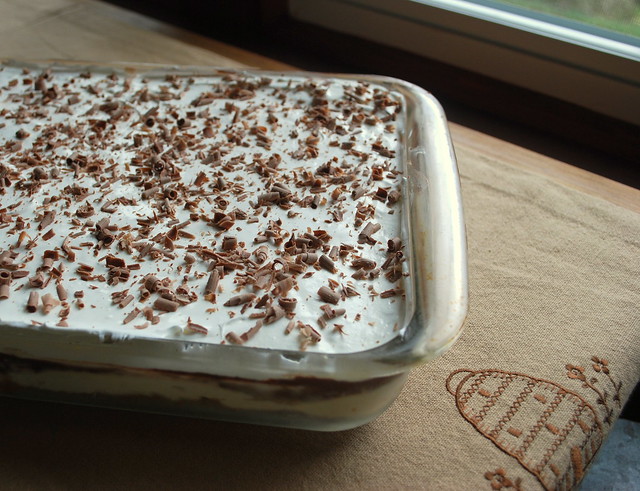
There are four layers, so you have to keep taking it in and out of the fridge but it was fairly easy to make. The top layer is slightly marshmallowish and added a nice "goo factor"


CMP Cake
recipe from QVC.

The crust:
1/2 cup finely chopped unsalted peanuts
1/2 cup of butter melted
2 cups graham cracker crumbs

Mix all ingredients together and press into bottom and sides of a 13x9 pan. Bake in preheated 350 degree oven for 15 minutes. Cool completely.

First layer:
1/2 cup peanut butter
8 oz. cream cheese
1 cup powdered sugar
8 oz. thawed non-dairy topping (like cool whip)

Cream peanut butter and cream cheese together, beat in sugar. Blend in topping. Spoon dollops onto cooled crust and then gently spread to cover crust. Refrigerate while making the second layer.

Second Layer:
2 (3 ½) ounce instant chocolate pudding mix
2 ¾ cups cold whole milk

Beat pudding mixes and milk until thickened. Spoon dollops into pan and spread gently.  Refrigerate while making the third layer

Third Layer:
8 ounces non-dairy topping, thawed
1 cup marshmallow cream (I used a 7oz jar)
4-6 tablespoons chopped salted or unsalted peanuts or chocolate shavings.

Beat topping with marshmallow cream, once again spread dollops onto second layer and gently spread. Sprinkle peanuts or chocolate shavings over the top. Chill at least one hour before serving, store in refrigerator.

Friday, May 24, 2013

Old Fashioned Ranger Cookies

Ranger cookies 3

As most of you know my friend Amy started a site called Cookie Hound. If you haven't already visited I urge you to check out the plethora of cookies there. All cookies all in one place!

Since she started the site, I've been in a cookie frenzy. I keep seeing new recipes and thinking...."oh yes, I must make these and then submit them to Cookie Hound". Not that I have any problem making cookies. I love making pie too. Pie is kinda my thing. I'll take pie over cake any day of the week. Pie and cookies would be a toss up. I love them both. Brownies, that's a whole nother story.

So I found this recipe for Old Fashioned Ranger Cookies on a site called Following in my Shoes. I'm a sucker for a recipe with a background and this one had one. Rachel said:
"One of my Dad’s favorites, Mom would make batches and batches of these cookies, each laden with brown sugar, butter and cereal. I tweaked her recipe this year, only slightly, adding cranberries and using Corn Flakes instead of Rice Krispies".

I also love it when the words "old fashioned" appear in a recipe. It usually means it's a recipe with some history and perhaps a story. Those are the best kind aren't they?

Well I tweaked this recipe even more than Rachel. I used Cocoa Krispies instead of the corn flakes and omitted the cranberries and coconut. No one in my house likes cranberries and although hubby and I love coconut, the kids don't, so I left it out this time around. Next time I make these, there will be coconut!

Ranger cookies 1

I rolled all my batter into balls in one shot and then just kept the ones that weren't in the oven yet stored in the fridge.

These were delightfully crunchy and oatey (is that a word?). I'm sure you could add or substitute whatever you'd like but the addition of the Cocoa Krispies gave these a wonderful chocolaty crunch.

Old Fashioned Ranger Cookies
recipe from Following in my Shoes
1 cup unsalted, room-temperature butter
1 cup sugar
1 cup brown sugar
2 eggs, lightly beaten
2 cups All-Purpose flour
1 teaspoon baking soda
1 teaspoon baking powder
1 teaspoon salt
2 cups of “Rice Krispies” or Corn Flakes - I used Cocoa Krispies
1 cup oats - I used rolled oats.
1 cup coconut
1 cup chocolate chips (I substituted chips for the dried cranberries originally used in this recipe)

Oven to 350 degrees.

Using a mixer, cream the butter and sugars together. Add the two eggs and combine. In a separate bowl, combine the flour, baking soda, baking powder and salt. Then slowly add to the wet mixture.

Stir in (by hand as the dough will begin to get stiff) the cereal, oats, coconut and chocolate chips until combined. Line a baking sheet with parchment paper. Roll dough into 1 inch balls and lay each on the parchment. Bake for 10-12 minutes or until edges just begin to become golden. Remove from the oven and allow to cool briefly before transferring the cookies to a wire rack. Once fully cooled, store in an air-tight container.

Wednesday, May 22, 2013

Sweet Bacon Tater Tots

Sweet Bacon Tater Tots 3

Can I tell you how lucky I am to be married to my husband?

We are the perfect pair. We make each other laugh all the time. I mean the man cracks me up till I have tears rolling down my face. He just has the best sense of humor. I laugh every single day of my life. Marry a man that makes you laugh ladies. I think it's one of the most important parts of a relationship. He brings joy into my life. I hope you are all that lucky.

And he is always trying to make me happy. He truly adores me and I can't tell you what a boost that is for your ego. I highly recommend it.

He's my carpenter, my jar opener, my reacher of bowls and baskets in high places, my sounding board, my lugger of all things heavy, my recipe tester, my eater of all the "uglies" before I take a photo, my back scratcher, my blanket getter, my confidant, my foot rubber (but not nearly enough!), my truest friend, my believer and love of my life. He makes me feel safe, he makes me feel content and most of all he makes me feel extremely loved.

I just thought he deserved a little shout out. He had a rough week. I've been working him like a dog to get the yard ready for my son's graduation party. Saturday we were out in the yard at 7:30am and worked all day. We were exhausted. John started to complain that the base of his thumb hurt. By bedtime it was really hurting. By 1am he was on the iPad googling to see what time the walk in clinic opened.

Let me give you the back story. About 10 days ago he was building me a gigantic birdhouse that was my Mother's Day gift. While he was drilling out the holes, his drill kicked back and hit him at the base of his thumb. It hurt, and it got a little bruised but he really didn't think too much of it. Sunday after a day of lots of lifting and shoveling and moving heavy stuff, he was really hurting. So off to the walk in. He walked out with a temporary cast. It was fractured. All that time walking around with a fractured hand. Oy!

I felt bad. I instinctively did what I always do when I want to make someone feel better. I feed them. I put a batch of Ranger Cookies in the oven (recipe coming) and decided to make him these Sweet Bacon Tater Tots. If there is one thing that will make my husband feel better, it's bacon.

My mother-in-law told me about a recipe she saw on The Chew called Tasty Trashy Taters. That recipe had the tots stuffed with cheddar cheese. Let me tell you, I tried to stuff mine with cheese. It just wasn't happening. No matter how small I sliced that cheese, the tater tot fell apart. I was so frustrated. I decided to skip the cheese altogether. I dipped them in the same mixture I used on my Sweet Bacon Chicken Wraps. They were fantastic!

These were such a hit. I couldn't get them out of the oven fast enough. The cheese was not missed at all. One pan gone in minutes. I could barely photograph them before they were scooped up. John had bacon AND cookies. He had a good day.

The Sweet Bacon Chicken Wraps that I make are one of my most popular appetizers. I think these will be following very closely behind.

Sweet Bacon Tater Tots

Make sure your tots are thawed. I cranked the oven up at the end to get the bacon nice and crispy.
Sweet Bacon Tater Tots
recipe from Lisa @ The Cutting Edge of Ordinary
Approximately 50 - 55 tater tots (thawed to room temperature)
1-16-ounce package Bacon (strips cut in 4 pieces)
2/3 cup Brown Sugar
2 tablespoons Chili Powder

Preheat oven to 375 degrees. Line a cookie sheet with foil and place a cooling rack on top of the pan. This will allow the bacon to crisp on all sides.

Cut each bacon strip into 4 pieces. I found using kitchen shears worked best for this. Cut the bacon in half and then cut each half in half again.

Wrap each thawed tater tot in bacon and then roll it in the brown sugar mixture. Place on top of the cookie rack.

Bake about 10 to 15 minutes at 375, then increase the oven to 400 and let them cook another 5 minutes. Check to see if they are crisping up. You may need to leave them in 5 minutes longer. Check frequently at this point so they don't burn. Serve warm.

Friday, May 17, 2013

Chicken and Noodles

Chicken Noodles 2

I suppose the days that I will be wanting to make hearty soups are drawing to a close. It's a shame because love everything about fall and winter including the all the foods that come along with those seasons. As some of you know...I'm not particularly fond of the summer. Yes there are aspects of it I love, but when the heat and humidity kick in, I'm pretty much done with it.

Living in New England I get a few extra months to make soups, stews and hearty casseroles so that makes me happy. The warm weather has poked it's head through here a few times, but in typical New England fashion we'll have one day when it's 75 degrees and the next morning we'll have a frost warning. We actually had 2 frost warnings this past week. We had to pull my fig Thor into the garage. Yes I named my fig. I plan on having him around a long time so I thought it only fitting that I name him. Most people think I named him after the God of Thunder but I actually named him after a character on Nurse Jackie. We love Thor. A little God of Thunder action wouldn't hurt either. I want figs dammit!

I actually made these chicken and noodles a few weeks back when it was still quite chilly. I can see this recipe on heavy rotation during the colder months.

I had never used frozen noodles before this recipe. We LOVED them! If you haven't tried them before I highly suggest you do. I bought the Reames brand and they were just delicious!


Chicken Noodles 1


Chicken and Noodles
recipe from Pioneer Woman
1 whole Cut Up Fryer Chicken * see my note
2 whole Carrots, Diced
2 stalks Celery, Diced
1/2 whole Medium Onion, Diced (optional)
1 teaspoon Salt
1/2 teaspoon Turmeric
1/4 teaspoon White Pepper (more To Taste)
1/4 teaspoon Ground Thyme
2 teaspoons Parsley Flakes
16 ounces, frozen "homemade" Egg Noodles such as Reames
3 Tablespoons all-purpose Flour

Cover chicken in 4 quarts water. Bring to a boil, then reduce heat to low. Simmer for 30 minutes. Remove chicken from pot with a slotted spoon. With two forks, remove as much meat from the bones as you can, slightly shredding meat in the process. Return bones to broth and simmer on low, covered, for 45 minutes.

Remove bones from broth with a slotted spoon, making sure to get any small bones that might have detached. Add the carrots and celery (and onions, if using) to the pot, followed by the herbs and spices. Stir to combine and simmer for ten minutes to meld flavors.

Increase heat and add frozen egg noodles and chicken. Cook for 8 to 10 minutes. Mix flour and a little water. Stir until smooth. Pour into soup, stir to combine, and simmer for another 5 minutes, or until broth thickens a bit. Test and adjust seasonings as needed.

* Note - I skipped using a fryer and just took the meat off a rotisserie chicken then boiled the bones to make broth. It worked out really well.

Tuesday, May 14, 2013

Portable Chocolate Snack Cake

Portable chocolate snack cake

First of all I want to thank each and every one of you who responded to my last post. I am so grateful for the feedback. So many of you emailed me and messages me through Facebook to share your experiences, given me guidance and held my hand through what will be the next transition for me. All your words of wisdom have helped me come to a decision. I think I will be monetizing the blog. I don't know who I'm going to go with yet, but over the next few weeks I'll be working on a decision. So thank you all again. You guys always pull through for me!

Anyhow......life in general has been so busy.

I've got a son who is turning 18 and graduating from high school. He actually graduates on his 18th birthday. I told him he won't forget the day he graduates that's for sure.

John and I have been feverishly working in the yard trying to get everything looking great for the party we'll have for Jesse. We decided to roast a pig so this should be a grand adventure. I'll make sure to take lots of pics. If any of you have roasted a pig before, I'd love to hear from you! I've added a new "email me" button off to the right ---> I'll take any tips and tricks on pig roasting.

With that being said....on to cake.

I made 3 desserts for Mother's Day. Coconut Chocolate Chip Bars, Mini Cannoli Bites and this Chocolate Cake. Why three desserts? Well cause I know one of my Mom's favorite desserts is Cannoli, so I made the bites for her. I have a lot of coconut lover's in the family so I made the bars and them and the chocolate cake was for my youngest because he's so picky I knew he wouldn't eat the bars or the Cannoli Bites, but I knew he'd eat chocolate cake. This chocolate cake in particular.

Like the title says...it's portable. It's a great cake to make for a picnic, or to pack in lunches. It's a sturdy little devil and it's loaded with chocolate flavor. I've been making this cake for years. I blogged about it back in 2009 and I thought it needed re-visiting.

I cover the top with big chocolate chips (Ghirardelli). No measuring, I just pile them on until the whole cake is covered.

For those of you following my sugar war.....I had one Cannoli Bite on Mother's Day. That was all. Pretty impressive when I'm surrounded by dessert right?

Portable chocolate snack cake 1


Portable Chocolate Snack Cake
recipe from Lisa @The Cutting Edge of Ordinary
2 squares (1 ounce each) unsweetened chocolate
1-1/4 cups all purpose flour
1/2 teaspoon baking soda
1/2 teaspoon salt
1 egg
1 cup sugar
3/4 cup cold water
1/3 cup vegetable oil
1 cup chocolate chips (I don't measure)

In the microwave melt the unsweetened chocolate, let cool for 10 minutes. Combine the flour, baking soda and salt, whisk together, set aside. In a mixing bowl beat the egg and sugar. Beat in the water and oil. Stir in the melted chocolate and gradually add in the dry ingredients. Mix until blended.

Pour into greased 8 inch square baking pan and sprinkle with chocolate chips. I just cover the whole top with chips. Bake at 350 for 35 - 40 minutes on until center comes out clean with a toothpick. Cool on wire rack.

This recipe can be doubled and usually is in my house!

Wednesday, May 8, 2013

A crossroads.

Mimi Mum 1

I'm finding myself at crossroads in this little blogs life.

I love my little space on the Internet. I love cooking and baking and taking pictures. I love interacting with people from all over the world. I've formed friendships with people I've never met face to face.

I feel a kinship with ladies from California to Maine. People that I've never shared a cuppa tea with or spoken on the phone to, but we laugh at the same things and we shake our heads in agreement at the same stories we read, or have  "OMG" and "Yum" reactions to glorious food that were both drooling over thousands of miles apart. We have a connection and I know that may sound funny to some, but it's real and out of everything that this blog have given me, I'm thankful most of all for this blog being the catalyst to connect me with these wonderful people.

That being said, this is my dilemma.

I've started this blog in December of 2007. I've published 964 posts. I've taken thousands upon thousands of pictures. I've cooked and baked almost a thousand different recipes. I've devoted a lot of time and energy here and I've never monetized the blog. I never wanted annoying ads popping up. I like the simple look that it has now, but I also know that I could be making a bit of money for all my time and effort, but is that what I want to do?

I'm really at fork in the road here. I work 50+ hours a week outside my home. I don't have the kind of time other bloggers have to devote to this site. I find myself scrambling some weekend just to make something and then take a picture of it to get it posted. I don't want to be that way.

I never wanted this to be something I "had" to do. I vowed that from the beginning and if it's cost me a bigger following, so be it. I'm not going to change who I am and feel forced to post when I don't want to. While I love sharing, I have a "real" life that needs tending to also.

My life is filled with "I'll nevers". Things I know will never happen to me. I'm not the kind of person who always wants to be in first place. I'm happy back at the end of line. I never want to be frantically trying to post something. I want things to pour out easy and naturally. I'm so ok with the I'll nevers.  

For instance:
  • I'll never post 5 times a week. A few times a week is where my pace is at and in the summer that sometimes dwindles down.
  • I'll never having everything looking perfect (but I'll try and choose recipes that your family and friends will enjoy and I try to photograph them as best as I can).
  • I'll never have a cookbook deal - and I'm ok with that.
  • I'll never let this space replace the time I spend with my loved ones.

I can't even find the time to categorize my recipes, re-design my blog or go dot.com! Now if I were home could I do all those things and more? Absolutely, but it doesn't seem like it's going to happen any time soon.

Can I make as much money from this blog as I do at my current job? Probably not. Would I love to be able to walk away from the day job, which I've been at for 30 years now? Yes, yes I think I would. Will that happen?Again, probably not.

Part of me hates having to do this and part of me is excited thinking that maybe I can stash away a little money for my dream kitchen.

So I need your guidance. I've reached out to to few of you already, but I'd love more feedback from you and from fellow bloggers. All your input will be so helpful. Here are some of the questions rolling around in my head.

Do you monetize?
If so, with who?
Positives? Negatives?
How much did you spend on a blog re-design? I had one person quote me almost $4,000! That's never gonna happen!
If you are over the moon about your design, would you share who you used?
Have you had any feedback from readers about the ads on your blog?
How much can you really expect to make?
Do ads on blogs annoy you? If so, would they it make you stop reading the blog all together?

I know I'm never going to be a Pioneer Woman and make boatloads of money, but if I can pay for some of my groceries and put some money away for my kitchen fund, that would really make me happy. Heck, I was thrilled when my Facebook page hit 2,000 likes only to read that very day that one of my fellow blogger hit 30,000. That's just crazy. 2,000 is a much cozier number don't you think?

You are what makes it all happen. You are the reason I blog, so let your voice be heard. Now is the time to tell me what you think. Good or bad, I want to hear it all.

Monday, May 6, 2013

Almond Meltaway Cookies, Giveaway winner and a great new site!

Almond Meltaways

How's that for a title?

FIRST...the winner of the beautiful garden markers.....Dolores Tabor!

Dolores said: "My favorite herb is Rosemary, love it. As a plant on the garden walkway so you can smell it when you brush against it".

Dolores please contact me with your mailing information. You can message me to the right by clicking the "contact me" button, or send me a message on Facebook! CONGRATS!

Thank you again to Eileen from Say Your Piece for providing the beautiful garden markers!

SECOND: I have a fantastic new site to tell you all about. It's called Cookie Hound. The master mind behind this site is my friend Amy from Very Culinary.

You've all seen Tastespotting and Foodgawker right? Well imagine a site like those but devoted entirely to cookies! Yes...ALL COOKIES ALL THE TIME!

Who doesn't like cookies? Now you can explore page after page after page of every kind of cookie you can imagine for any kind of occasion you can think of. It's cookie nirvana!

I was lucky enough to be included in the inception of this terrific site. You can click my Cookie Hound button on the right to see all the cookies I've submitted so far, or just click here. Make sure to hit home to see the hundreds of other cookies!

Almond Meltaways 1

THIRD: These cookies! These melt in your mouth cookies.

In between working in the yard all weekend I snuck in enough time to make a batch of these delicious little cookies. They took no time at all to whip up. My youngest was just crawling out of bed as I was frosting these. He ate the ugly ones for breakfast!

Almond Meltaway Cookies
recipe from The Novice Chef
2 cups all purpose flour
1/2 teaspoon baking powder
1/4 teaspoon flaked sea salt (or can use regular table salt)
1 cup (2 sticks) unsalted butter, room temperature
3/4 cup granulated sugar
1 large egg
2 teaspoons almond extract (I used pure, not imitation)
Icing:
1 cup powdered sugar
1 tablespoon milk (or water)
2 teaspoons almond extract

Preheat oven to 375°F. Line a baking sheet with parchment paper or a silpat. Set aside.

In a medium bowl, whisk together flour, baking powder and salt. Set aside. In a stand mixer, beat butter and sugar until light and fluffy. Add egg and almond extract, mixing until combined. Add flour mixture 1/2 cup at a time, mixing until a soft dough forms.

Roll 1 tablespoon of dough into small circles and then press with hands (or with the bottom of a cup) into a disk shape. I floured the bottom of my cup so the dough wouldn't stick. Place on prepared baking sheet.

Bake for 8 minutes. The cookies will not look browned or cooked, but they are! Remove from oven and let cookies rest on baking sheet for 5 minutes. Then transfer to a wire rack to cool completely.

For icing:

In a small bowl, whisk together powdered sugar, milk and almond extract - until smooth.

Using a spoon, smooth icing onto the top of each cookie and let set for 10 minutes, or until hardened. Store in the fridge, let come to room temperature when ready to serve.

Friday, May 3, 2013

Rolo Bars

Rolo Cake Bars 1

This nice weather makes me happy.

My whole attitude changes and I have a sunnier outlook on life.

I'm dreaming about all the flowers and veggies I'll plant and the lazy days I'll get to spend on my new couch in the gazebo. A glass of iced tea, some magazines and a long afternoon are in my near future.

I love to dig in the dirt and I love laying pavers and landscaping. I often tell my husband that maybe I was meant to be a stone mason. I really love it that much. I have my little trowel and my rubber mallet and I just go to town on those pavers. I've actually become quite good at getting them in the ground perfectly. Maybe I missed my calling?

All this digging outside keeps my mind off my sweets too. I've really still be doing really good, but I have faltered and had some sugar. I can't cut it out of my life completely!

Rolo Cake Bars 2

A few weeks back we invited one of John's friends Jesse and his wife Sara over to the house for dinner. Jesse worked with John and I had met him once before, but neither of us had met his wife Sara. We had become Facebook friends with her so we kind of had a feel for what kind of person she was, but still we had never connected in "real" life.

Well we spent an absolutely lovely evening with them. Sara was more delightful then we imagined and Jesse was just a sweetheart. I love feeding people who like to eat and who love my food. I think my dinner made them very happy but these Rolo bars.....I think these pushed them over the edge. I have to admit, I didn't have any. I was still being really strict about my sugar intake, but if there reaction was any indication, these were fantastic. I even sent them home with a doggie bag!

Rolo Cake Bars 4

With only 4 ingredients they are a snap to make too!

Rolo Bars
recipe from Cookies & Cups
1 box (18.25 oz) yellow, vanilla or white cake mix
5 oz evaporated milk, not sweetened condensed!
1/4 cup butter, melted
40 Rolo Candies, unwrapped and cut in half

Preheat oven to 350° Spray a 9x13 pan with cooking spray. With your mixer, beat cake mix, evaporated milk and butter until combined. Mixture will be thick and sticky.
Divide batter in half and press 1 half into the bottom of the pan. Wetting your hands with cold water seems to help with this.

Bake until just set, approximately 15 minutes.

Remove from oven and immediately place the Rolo candies, caramel-side down over the batter. Drop remaining batter on top of Rolos in teaspoon sized amounts. Bake for 20-24 minutes longer until top begins to turn golden. Cool completely before cutting into squares.