
Monday, December 23, 2013
My wish for you.
I'll be away from the blog for a bit.
I always take the last few weeks of the year to really unwind and enjoy the holidays.
I'll be cooking and baking for the next few days and then I plan on doing a whole lotta nothing.
I want to thank you for visiting, for making my recipes and giving me feedback, (I love that!). Your enthusiasm for this little blog of mine keeps me going and your thoughtful emails over the past year have left me smiling.
The beauty of this season and the kindness that you have shown are not lost on me. I'm grateful for each and every one of you.
My wish for you is that you are surrounded with the people you love, sharing delicious food, and truly feeling the joy of this Christmas season.
Peace & love,
Lisa
Wednesday, December 18, 2013
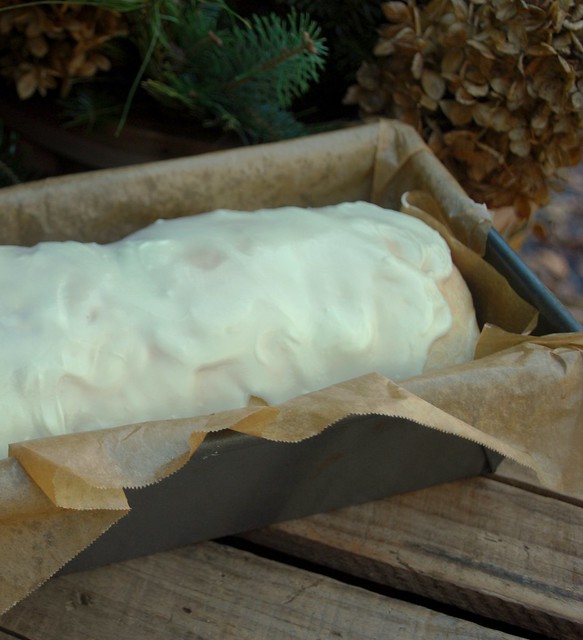
Easy Brown Sugar Cinnamon Bread - no knead, no fuss!
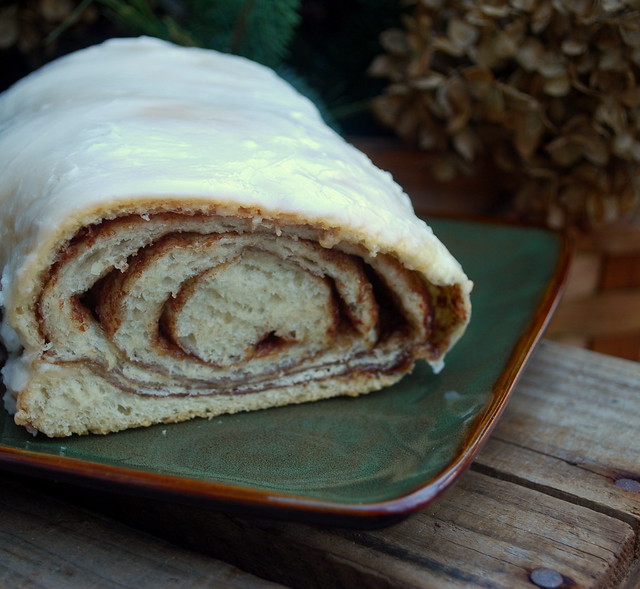
I've baked a lot of loaves a bread in my day. It's a bit of a task, especially when you work full time, but I still love to feed my family home baked bread...and now I can.
I have a little secret and if some of you already knew this and didn't tell me, then shame on you. Where you hiding this little gem from me all along? Rhodes Frozen Bread Dough.
Frozen bread, the in freezer, take and bake! It even comes in a 5 pack! Why didn't I know about this?
I stumbled across a very pretty blog called Everyday Occasions and I saw this beautiful loaf of cinnamon bread. I scrolled down the screen and saw that she made it with frozen bread dough. It was her little secret and now it's your and mine too!
This bread is good. I mean really good. All I had to do was let it defrost in the fridge overnight, take it out the next day and give it some time to rise. I did this in my oven. I turned the oven on to it's lowest setting, put a pan of warm water on the bottom rack, oiled a bowl and threw some oil on the bread, covered it with plastic wrap and a towel, shut the oven off, and let it rise for a few hours. It was so simple.
I followed Jenny instructions for the cinnamon bread. So easy. Now my mind is churning with all the other stuff I can make with this dough. She has recipes for monkey bread, and pizza bread and pecan rolls!
Who doesn't need some time saving recipes especially at this hectic time of year? Next time I think I'll add some raisins, or maybe some nuts, or jam....oh man, I see lots of delicious breads in my future!
Easy Brown Sugar Cinnamon Bread
recipe from Everyday Ordinary
1 tablespoon of vegetable oil
1 loaf of frozen bread dough (Rhodes brand)
3 tablespoons of butter, softened
1/3 cup of brown sugar
1 tablespoon of cinnamon
Egg Wash
1 egg, beaten
Glaze
2 tablespoons of butter melted
1 cup of powdered sugar
milk, to thin, if necessary
Let the dough thaw overnight in the refrigerator. You can also use your defrost setting the in microwave if you're in a pinch. Instructions for defrosting are on the back of the package. Each log of dough will make one loaf.
Set your oven to it's lowest temp. put in a pan of warm water, oil the bowl and rub a little oil on the bread, cover with plastic wrap and a towel, shut the oven off, and let it rise for a few hours.
Roll the dough out onto a floured surface. Make sure you roll it out to fit the size of your pan. Butter it generously. Top with brown sugar and cinnamon. You could also add raisins and nuts or whatever else makes you happy. Roll it up from the short end and place it seam side down in your pan. (I used a bread pan (loaf pan). Crush the loaf with a little oil, then let it rise for another hour and a half. Before they go into the oven, brush with an egg wash.
They bake at 350 degrees for 20 minutes - or until golden (mine took 30 minutes). Another way to check to see if it is done is to "thump" the bread. If it sounds hollow it is done!
Drizzle a simple mixture of melted butter, powdered sugar and milk to make a quick glaze. Let it harden before slicing.
Friday, December 13, 2013
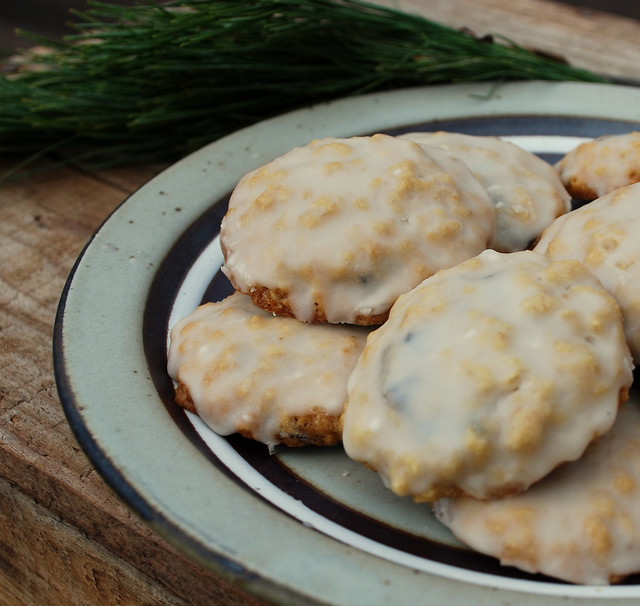
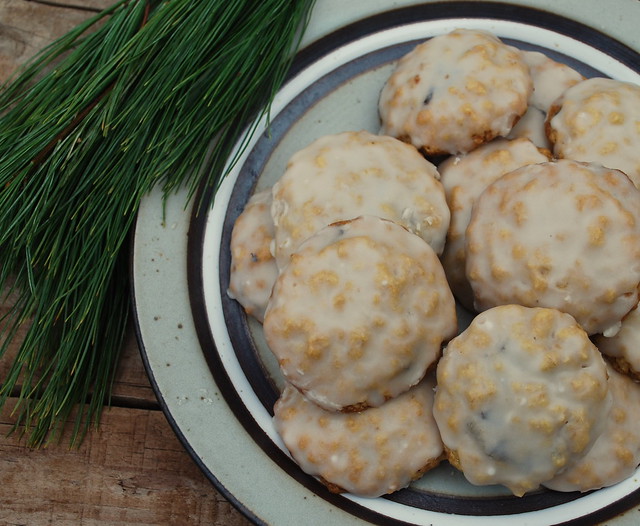
Chocolate Chunk Maple Oatmeal Cookies with Maple Glaze
The holiday season is in high gear and I'm happy to say...I am not.
I've made it a priority to simplify things in 2013 and not stressing about Christmas is one of the ways I'm doing that. I shopped early. No hassle, no fuss, no lines, no frenzy. I bought a lot online, I got some great deals and I didn't stress myself out.
The only thing I have left to do over the course of 10 days is to make some cookies & fudge, wrap the last of the presents, and ENJOY. Isn't that was this season is supposed to be about anyway?
For years I stressed myself out and made myself crazy and I always ended up getting sick from wearing myself out completely. I just refuse to do it anymore.
I'm asking for help now. I used to make the entire meal on my own. Now I ask my brothers to bring an appetizer and a dessert. I ask for help cleaning up. My mom and I were the only ones standing at the sink doing dishes or cleaning up. No more!
If you are a Miss "Do It All" like I was I highly recommend just letting a lot of it go and delegating. One person can't do it all, they just can't, and you shouldn't. Take time for yourself, "be" there in the moment, and really enjoy your holiday ok?
I'm off my soapbox now! Let's talk cookies!
I found this recipe in a Family Circle magazine and adapted it quite a bit to make to my own. I'm a maple freak. It's just one of my most favorite flavors. So I tweaked this recipe a bit and gave it a maple glaze.
We loved these cookies! They are on the small size, little mini bites of goodness!
Chocolate Chunk Maple Oatmeal Cookies with a Maple Glaze
Adapted from a recipe at Family Circle
makes about 36 cookies
¾ cup all-purpose flour
½ teaspoon baking soda
dash salt
1 stick unsalted butter, softened
½ cup packed light brown sugar
¼ cup pure maple syrup (not pancake syrup)
1 egg
1 ½ cups quick cook oats
½ cup chocolate chunks (or chips)
Glaze
1 cup confectioners’ sugar
2 tablespoons of maple syrup
Heat oven to 350. In a bowl or stand mixer beat the butter, sugar and maple syrup for 3 minutes. Beat in the egg until just combined. Stir in the oats chocolate chunks.
In another bowl whisk together the flour baking soda and salt. Pour in the flour and beat on low until just combined. Stir in oats and chocolate chunks.
Drop by scant teaspoons size rounds of batter onto a parchment lined baking sheet, spacing them about 2 inches apart. Bake for 12 to 14 minutes, or until just golden. Remove to wire rack to cool completely.
Once the cookies are cool, you can make the glaze.
For the glaze:
Combine 1 cup confectioners’ sugar and 2 tablespoons of maple syrup. If you need to thin it out a bit more, just add in a little more maple syrup. Dunk the tops of each cookie in the glaze and let harden.
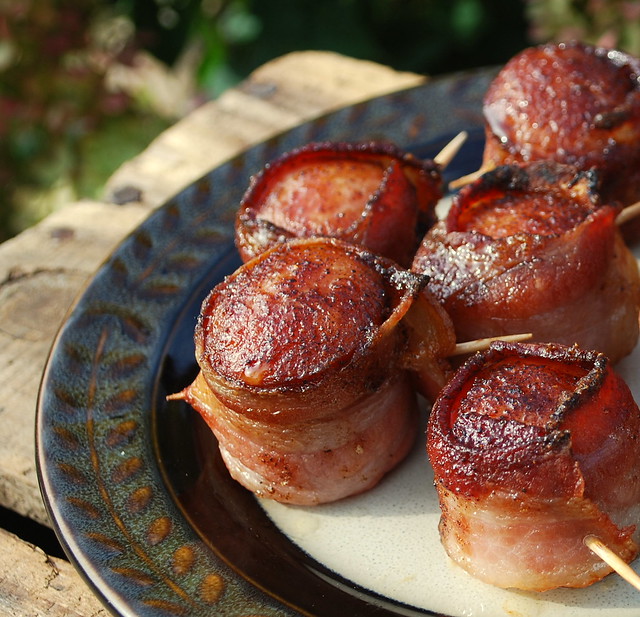
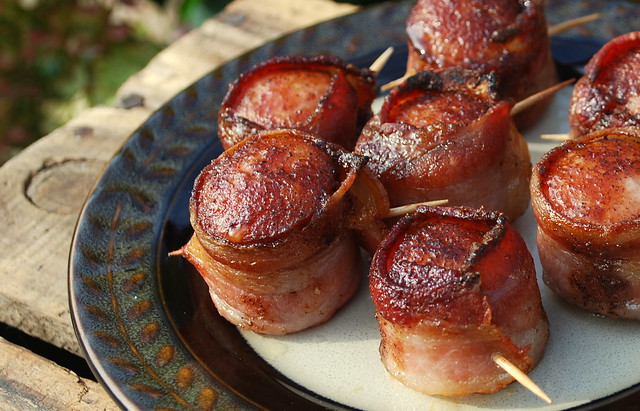
Tuesday, December 10, 2013
Turducken!
Recently I was contact by the nice folks at Echelon Foods in Canada. They wanted to send me a turducken to cook and review. Well let me tell you, when I mentioned it to my husband he just about leaped out of his chair. "tell them YES!" He's always wanted to try a turducken.
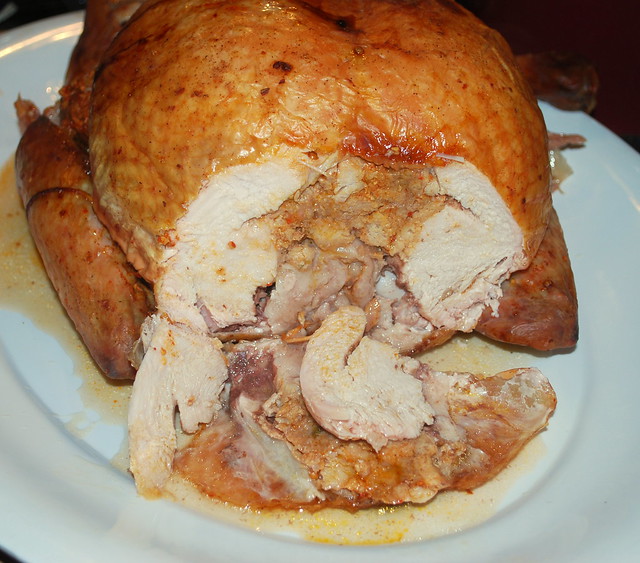
In case you don't know what a tuducken is: The turducken is a tasty beast. De-boned duck and chicken breasts are wrapped up with sausage stuffing and placed into a whole turkey, also deboned except for wings and drumsticks.
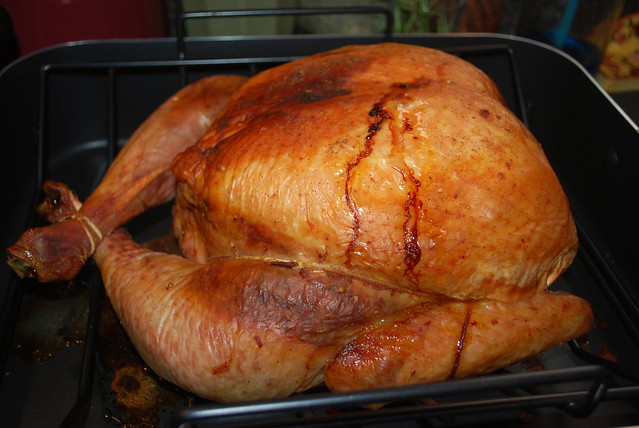
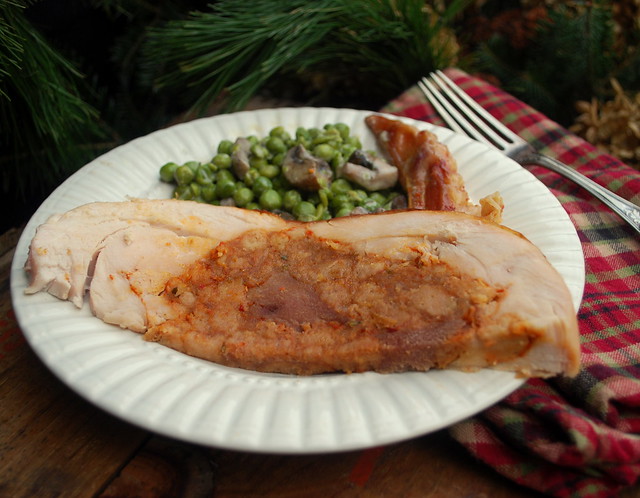
Look at the beautiful color. That was with no basting!
Thaw, pop it into your oven, bake without basting, and then serve it to your guests with no need to carve or throw away bones! It couldn't have been simpler.
I decided to have a little turducken party last Sunday. We invited a few friends and some family and we went to town putting a hurting on this baby. Everyone LOVED it and I love the fact that all I did was throw it in a roasting pan, cooked it low and slow and take it out and slice it up was great! There is practically no waste!
Instead of the usual ham or turkey, think about getting a turducken this holiday season. We highly recommend it! It was moist and juicy and that stuffing.....it was so good!
Echelon has turduckens with two different kinds of stuffing and they even have gourmet turducken burgers!
My friend John could hardly wait for me to take a picture!!
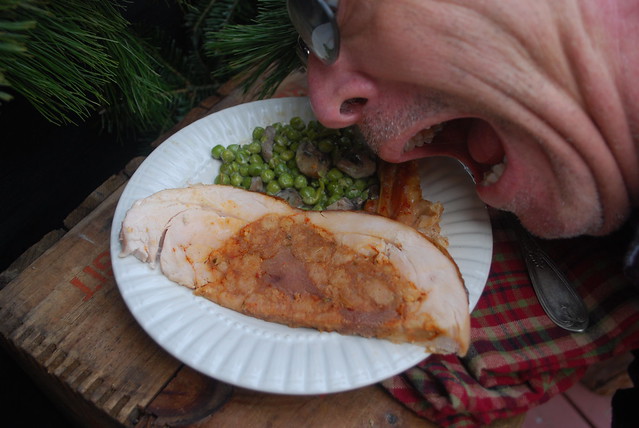
We all (and I mean all of my family and friends) recommend trying a turducken! Delicious!
Friday, December 6, 2013
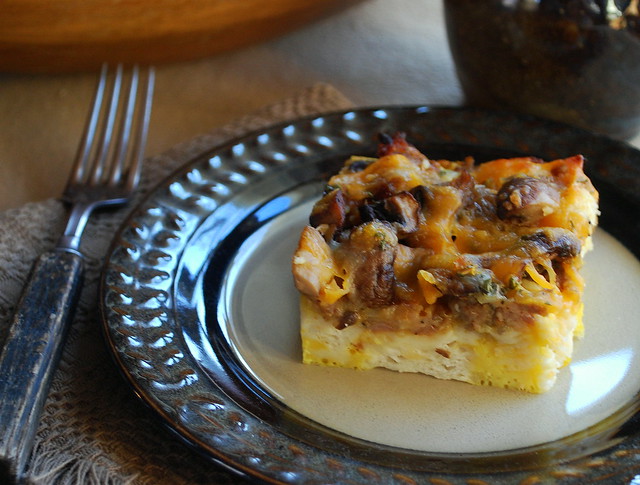
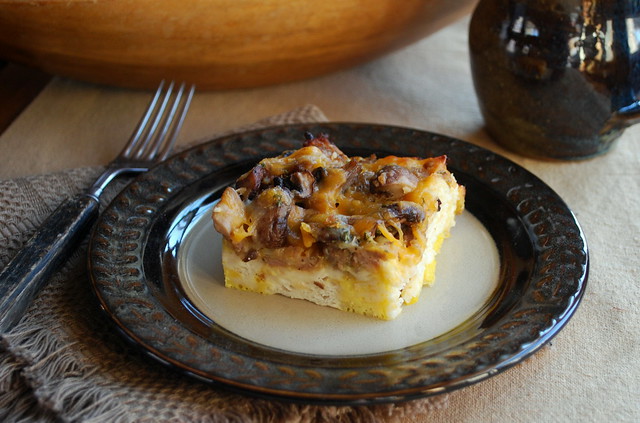
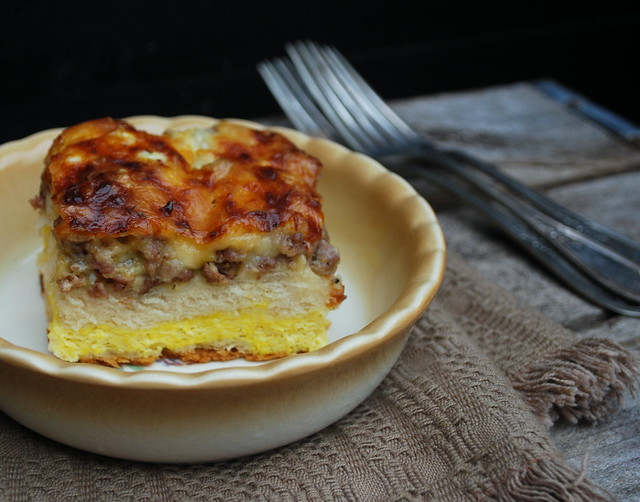
Bubble Up Breakfast Bake
Well all the containers came down from the attic, my house is decorated and the outside is decorated, so Christmas season has officially begun at our house! Hooray! We pick up our tree later today, so tonight will be all about the decorating!
The winter chill is starting to settle in here in Rhode Island. The wind is picking up and there is that gray/steel look to the sky.
I know a lot of people hate the winter but I love it. I try and embrace each season here in New England. We are blessed with getting to experience all four, not everyone can say that about where they live. Still I hear the endless complaints about driving in the snow, or having to shovel snow. It's Rhode Island. It snows here. That's not going to change. If you really hate it that much, then I suggest you move. I really want to say that, but I usually don't.
So I'm one of those nut cases who loves the chill in the air and gets excited when we bring down the big bucket of hats, scarfs and mittens from the attic. I love to bundle up. I love it when we boil water in the kettle almost every night for tea and hot chocolate. I love to put on my Smartwool socks. I'm a bit of a homebody. Maybe that's what makes me so acclimated to the winter?
I also love to fill the kitchen with delicious things to warm you from the inside out. What's better than a hearty casserole on a chilly night or a delicious hot breakfast to start your day?
If you search online for the phrase "bubble up breakfast bake" you will find quite a few recipes. I looked at dozens before deciding to just make up my own.
I served this Sunday for my friend Tati and she loved it! I gave her some to take home to her husband John and he loved it too. I've made quite a few breakfast recipes over the past year and I have to say this one was one of the best. I'm already planning on making it again and adding spinach.
Bubble Up Breakfast Bake
1 pound of breakfast sausage
1 tube of refrigerated buttermilk biscuits
1 medium onion, chopped
1 pound baby bella mushrooms, chopped
1 cup shredded cheddar cheese
1/2 cup shredded mozzarella cheese
6 eggs
1/2 cup milk
1 teaspoon Italian seasoning
salt and pepper to taste
Preheat the oven to 350 degrees.
Cook the sausage in a skillet on medium high heat. Drain any grease, set aside. Place the chopped onion in the same pan. You may need to add a little oil to the onions. Let the onions cook for a few minutes then add in the chopped mushroom. Cook until tender. Set aside.
Cut each biscuit into 8 pieces and place in the bottom of a greased 9x13 baking dish. Add the sausage in a even layer. Top with the onion and mushroom mixture. Sprinkle with cheese.
In a medium sized bowl whisk together the eggs, milk, Italian seasoning and salt and pepper. Pour the egg mixture over the rest of the ingredients.
Bake for 30 minutes or until a knife comes out clean in the middle of the dish.
Wednesday, December 4, 2013
One Year

It's been one year today.
365 days since he's been gone.
During those first few months I thought I'd never feel happy again. I felt like my heart was breaking. The passing of this little dog turned my whole world upside down. I can't even bring myself to think about the last time we saw him. It's just too painful. Just typing this has left me struggling to see the screen through my tears.

I remember in the days after he was gone telling people that I couldn't celebrate Christmas this year. How could I be happy and joyful without him in my life? I was truly devastated.
I cried. Oh how I cried. Barely holding it together at work. Choking back tears at every movie or commercial with a dog in it. Almost jealous when I saw friends with their pets. Feeling horrible for all the times I scolded him for being underfoot, or trying to sneak food. All the little day to day things that changed our daily life creeping up on me, making me feel so down.

Then came the firsts. The birthdays without him. The first time he wasn't there to sing (howl) every time we started to sing Happy Birthday. The first time he wasn't with us in the yard, laying in the shade as we tended to the garden, jumping in the leaves, napping on the deck, walking with us in the woods. I can't tell you how many times John would find me just sitting in a flood of tears, overcome with memories and sadness.

I must have said "I miss him" a thousand times since last December and John always replies "I miss him too".
I still have his tattered bunny on my bureau. I still pick it up and breathe him in, knowing that the day will come when I can't smell him anymore. A lock of his hair in a box, his collar and sweaters still in a big basket on top of an armoire. I can't bare to part with them. I don't want to have every little piece of him vanish.
So. yes, it's been a year and I wish I could say that I don't miss him quite so much, or that my heart still doesn't sink a little when John opens the door and he's not running ahead of him to greet me, or that I don't wake up and for a millisecond put my foot down and expect to feel his furry back under my feet.
He was my constant companion, my foot warmer, my snuggler, my precious Moose.

Many people have asked us why we haven't gotten another dog. There are days when I long for another and all the things I miss about having a pup, but we just can't right now. The thought of going through this again is just unbearable. I can't say that we will never have another dog in our lives again, but right now the pain is still too raw.
I miss him. I miss him so much.

Monday, December 2, 2013
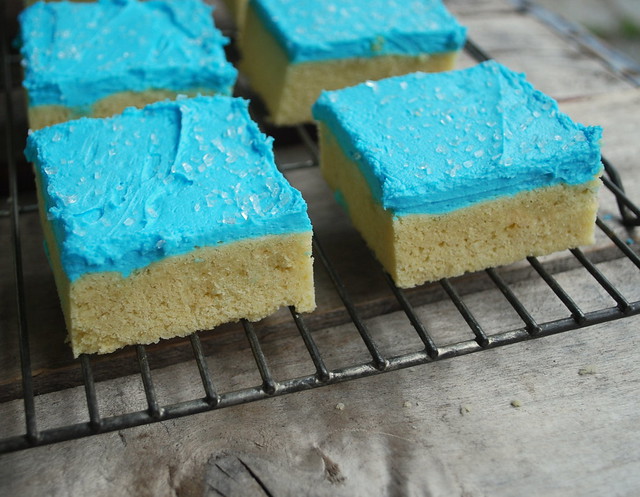
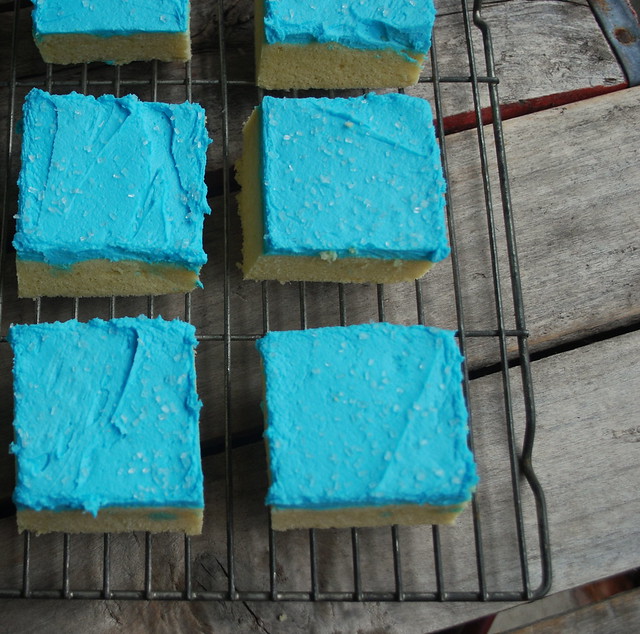
Sugar Cookie Bars (for Hanukkah)
We had a wonderful Thanksgiving filled with family and friends and then we had a wonderful Black Friday. No we didn't venture out for the bargains. I've never been a Black Friday shopper. I shop early so all my presents have been purchased for months now. I get my bargains in the summer and fall. We did go to a local craft show. It's sort of a tradition with us. I think we've been going for almost 10 years now. We bring a canned good for the food pantry, pay a dollar, and get to see all the beautiful things that local crafters and artisans make. It's sort of like Small Business Saturday one day early. We picked up a few little gifts that I just couldn't pass up and then we headed back home and ate turkey sandwiches. Best part of the day.
Saturday we ventured out again to get some pine roping for decorating the front yard. Saturday night we plunked ourselves on the couch, cuddled up in blankets and watched stupid movies. A pretty great weekend so far if you ask me.
Sunday we cooked another small turkey because we only had enough leftovers for a few sandwiches. Can you imagine? So we popped the bird in the oven bright and early, then I made some turkey stock with the bones and threw together a big pot of turkey escarole soup.
While the soup was cooking I made a batch of these Sugar Cookie Bars for my husband's boss who celebrates Hanukkah (hence the blue frosting). My youngest loves sugar cookies. Loves them. Since this makes a whole jelly roll pan full there was plenty enough to give away and plenty for Evan.
If you love sugar cookies but don't feel like rolling them out and cutting them into shapes, then this is the recipe for you. It'll feed a whole bunch of people too, so it's perfect for a pot luck, Hanukkah or Christmas party. The frosting can be tinted any color you like!
Sugar Cookie Bars
recipe from The Repressed Pastry Chef
1 cup butter (2 sticks) room temp
2 cups sugar
4 eggs
2 tsp vanilla
5 cups flour
1 tsp salt
1/2 tsp baking soda
Cream butter and sugar until fluffy. Add eggs, one at a time, mixing after each egg. Add vanilla & mix well. In a separate bowl combine flour, salt & soda & stir with a whisk to combine. Add to wet mixture and mix just until combined. Spread on a greased baking sheet (use a 13 x 18 pan) I used a half sheet pan.. Bake at 375 degrees for 10-15 minutes (this was 20 mins for me), until light golden brown or until a toothpick comes out clean. Cool completely and frost.
Frosting
1/2 cup butter; room temp
1/2 cup shortening
1 tsp vanilla
pinch of salt
4 cups powdered sugar
5 Tbsp milk
food coloring (if desired)
For frosting combine butter and shortening until smooth and creamy. Add vanilla and salt. Add powdered sugar in 1-2 cup increments until combined, then add milk & mix until smooth and spreading consistency. Spread over cooled cookie, then cut into bars.
Friday, November 22, 2013
Biscuit, Sausage & Egg Casserole
So Thanksgiving is fast approaching. It's one of my favorite holidays. What's not to love about a day that's all about the food?
I'm not crazy about turkey. It's ok. Making a turkey once a year is perfectly fine with me cause I'm all about the sides anyway. I was a vegetarian for over 20 years and I remember people always feeling bad for me when Thanksgiving rolled around, but I was always one happy girl cause there were so many other delicious things to eat besides the bird.
On Thanksgiving morning I'm up bright and early and I head straight to the kitchen to get started so my clan usually fends for themselves when it comes to breakfast, but I found a Biscuit, Sausage and Egg Casserole that is so easy and quick to put together that I think I can make this before my oven fills up for the day.
I changed a few thing from the original recipe that I found on At Home with Lady B. I read the reviews and many folks were complaining that the eggs were not fully cooked and that the biscuit layer was too thick I pulled this out of the oven at the suggested 30 minute mark and my eggs were still runny so I popped it back for more cooking time. I adjusted the ingedient amounts and time and it came out great.
This recipe does a bit of flip-flopping in the oven. The eggs sink to the bottom and the biscuits rise up to the middle. Pretty cool!
I think my husband ate half the pan! It's a keeper!

Biscuit, Sausage & Egg Casserole
Adapted from a recipe At Home with Lady B
5 ½ buttermilk biscuits (from an 8 count tube)
1 pound of any breakfast sausage (browned, drained, and cooled)
1 cup shredded mozzarella cheese
1 cup of shredded cheddar cheese
6 eggs, beaten
3/4 cup milk
½ teaspoon Italian seasoning
Salt & pepper to taste
Preheat oven to 425 °F. Crumble and cook sausage in a skillet over medium heat until browned. Drain.
Line bottom of an 8 x 8 inch baking dish with biscuit dough, firmly pressing perforations to seal. I put four biscuits in the bottom of the pan, flatten them out and then filled in the empty spaces using pieces of the remaining biscuit and a half. Sprinkle with sausage and then cheese. Whisk together eggs, milk, Italian seasoning, salt and pepper in a medium bowl until blended; pour over sausage and cheese.
Cover with foil and bake 20 minutes. Remove foil and bake an additional 20 – 25 minutes or until a knife inserted in the center comes out clean. Let stand for 5 minutes before cutting into squares; serve warm.
Monday, November 18, 2013
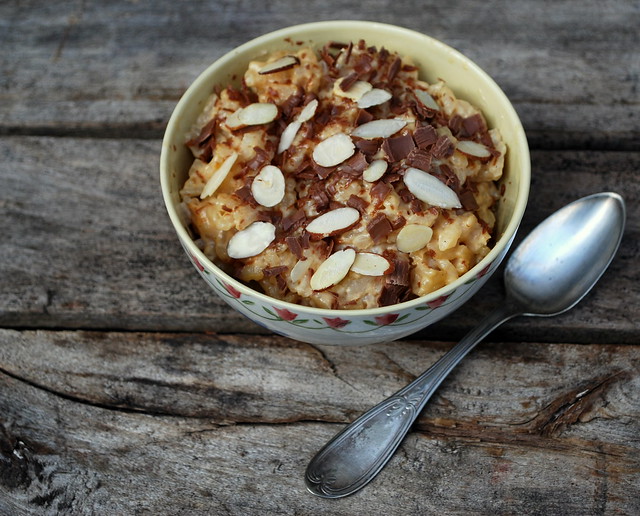
Almond Joy Rice Pudding
I'm feeling all cozy and homey right now. I love that hunkered down, cuddled up feeling that this time of year brings. I love wrapping myself up in a blanket and pulling up my thick knee socks. I love digging into the stash of books I've been collecting all summer and fall. I love that it's pie season. Had to throw that in, cause well...PIE!
My list making is going into overdrive. I've got my thanksgiving recipe lists (and folder), I've got Christmas present lists, I've got craft supply lists and the most important of all, I've got my "must make list". It's a little collection of recipes that I kind of pull from a bigger collection of recipes and move to the top. Priorities you know?
My friend Rebecca from Foodie with Family posted this recipe on her Facebook page last week. It was one of those moments where the clouds parted in the sun shined down and my heart screamed hallelujah! I am crazy mad for rice pudding. I also love coconut...and oh yeah, chocolate. I'm a bit crazy for that too. This recipe combined all three. Heaven. I ate this right out of the pot. I'm not ashamed to tell you that. I eat it cold too, but I couldn't wait to eat it. It was lunch for me last Saturday. Lunch never tasted so good.
Don't worry that the coconut water will make this too coconutty, it won't. This made enough for my friend Tati and I to eat. She is a rice pudding lover too. If you love it as much as we do, you may want to double the recipe!
Rebecca has a great recipe for Whipped Coconut Cream. Check out the link for that recipe.
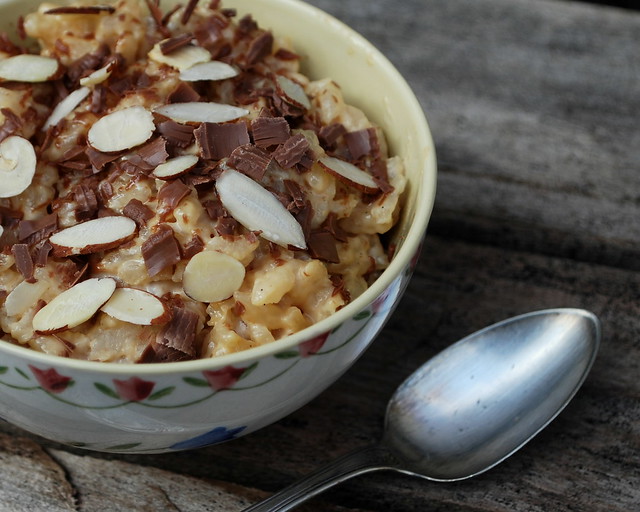
Almond Joy Rice Pudding
recipe from Rebecca - Foodie with Family.
1 can coconut milk (unsweetened)
1 can evaporated milk
Whole milk or half and half
1/2 cup arborio rice
¼ cup raw sugar
vanilla bean, split and scraped
a pinch of salt
shaved or chopped dark chocolate
Optional Toppings:
Whipped coconut cream (see recipe below)
Toasted coconut
Toasted sliced almonds
Pour the coconut milk and evaporated milk into a four cup measure. Add enough whole milk or half and half to measure 4 cups evenly.
Stir together the milk mixture, rice, raw sugar, vanilla bean (both the bean halves and the scrapings), and salt to a medium sized, heavy-bottomed saucepan over medium high heat.
Bring the mixture to a boil, stirring frequently, then lower the heat to medium low and allow it to simmer for 45-60 minutes, or until the rice is tender and the liquid is thickened. It will continue to thicken as it cools.
Let it cool several minutes, covered, before transferring to serving dishes.
To Serve Warm
Top the warm pudding with shaved or chopped dark chocolate, whipped coconut cream, and toasted coconut for Mounds bar pudding or add almonds with everything else for Almond Joy pudding.
To Serve Cold:
Cover the portioned pudding with plastic wrap directly on the surface of the pudding. Chill for at least an hour (but up to 3 days in advance) before serving. Top the chilled pudding with shaved dark chocolate, whipped coconut cream, and toasted coconut for Mounds bar pudding or add almonds with everything else for Almond Joy pudding.
Tuesday, November 12, 2013
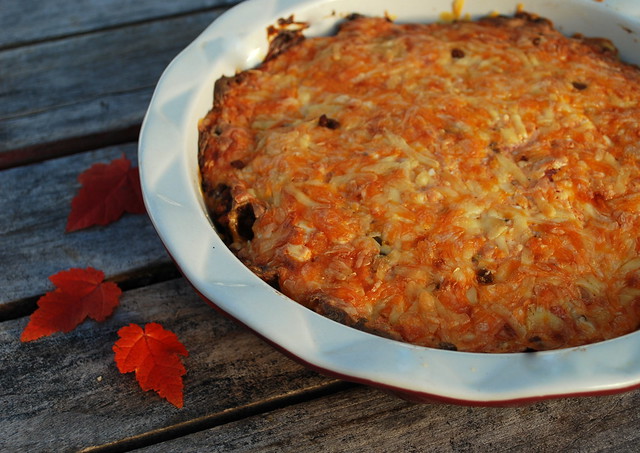
Dorito Taco Pie
Every fall and winter I have this dilemma. I can't photograph food 5 days out of the week.
Why? Well, I work full time and by the time I get home, it's dark outside.
I take all my photos in natural light, so when the suns goes down, nothing gets photographed. I don't have Photoshop, so what you see is what you get with me.
It does limit me to weekends to take a decent photos, and sometimes even then the weather doesn't cooperate here in New England.
That still won't stop me from sharing delicious recipes with you. I think you all can see past the not so stellar photo and know that when I tell you something is delicious and you should make it, it is.
This Dorito Taco Pie was delicious. The bottom is layered with crushed Doritos. Yes, Doritos. Trust me on this, and I know for some of you this is such a non-issue cause you already told me how much you love Doritos.
I made two of these because we had friends over to watch football. I served it with shredded lettuce, sour cream and guacamole. It was such a hit.

Dorito Taco Pie
recipe from my mother-in-law Carol!
1 pound of ground beef
1 pkg taco seasoning
2 cups Dorito Nacho Cheese chips, crushed
8 ounces of cream cheese, room temp
½ cup salsa
2 cups shredded cheddar cheese, divided
2 cups shredded lettuce
2 tomatoes, diced
Grease a 9x13 inch baking dish, or a deep dish pie pan. Place the crushed Doritos in the bottom of the pan. Cook the ground beef, breaking it up as it cooks. Drain any grease. Add in the package of taco season and cook as directed on the package. Spoon the ground beef over the crushed Doritos.
In a medium size bowl beat the cream cheese until smooth and then slowly add in the salsa. Pour this over the ground beef. Top with 1 ½ cups of cheese. Top the cheese with shredded lettuce and tomatoes. I skipped this step because we are not fond of hot lettuce and we don’t like tomatoes, but if you are go ahead and pile it on then add the remaining cheese. If you’re like us, add the lettuce and tomatoes after and just use the full two cups of cheese to top it.
Bake at 350 for 25-30 minutes or until cheese it brown and bubbly. Serve with sour cream, guacamole, etc.
Friday, November 1, 2013
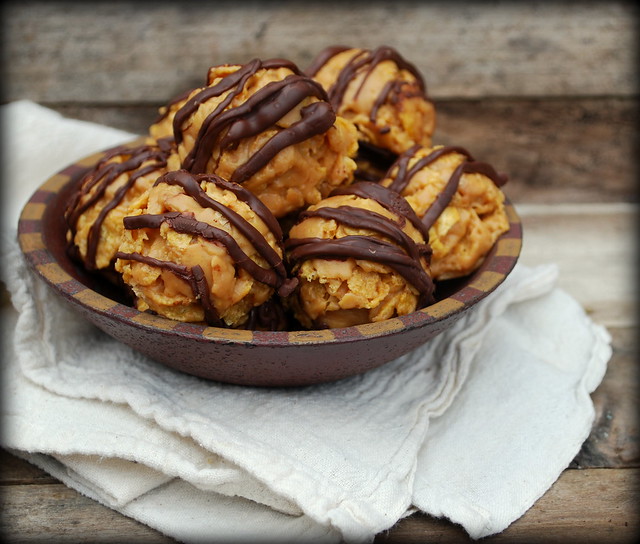
Peanut Butter Corn Flake Treats (No Bake!)
Hello November!
While October is usually my most favorite month of the year, this October proved to be a bumpy ride. While we thoroughly enjoyed our Ohio vacation, my heart was being pulled home. My Dad had a few cardiac episodes which involved two procedures, one very scary one in Boston which had us all on edge. He has pulled through and is even back to walking (for a few months with Mom by his side). I'm ever so grateful that he's doing well.
My youngest turned 17. Yikes, my YOUNGEST! When did I get this old? We had a big party for him last weekend. I'm still recovering from the marathon cooking session.
I found this recipe called Holycraptheseareamazing Cookies. I can't remember where I saw this recipe. I looked it up online and there are lots of bloggers who made these, so my apologies if you are the original creator! (Contact me and I'll link back to your blog!)
To be honest this one was in my recipe file for awhile. When you see a title like that you just have to make them right? The ingredient list was pretty simple too and they were no bake, a no brainer. I re-named this recipe Peanut Butter Corn Flake Treat cause they just weren't amazing to me. They were good, don't get me wrong, but I'm not a peanut butter freak, so they weren't fantastic or amazing in my book but my kids loved them, but what kid doesn't like a rice krispie type treat? This would be a great recipe to make with youngester/toddlers.
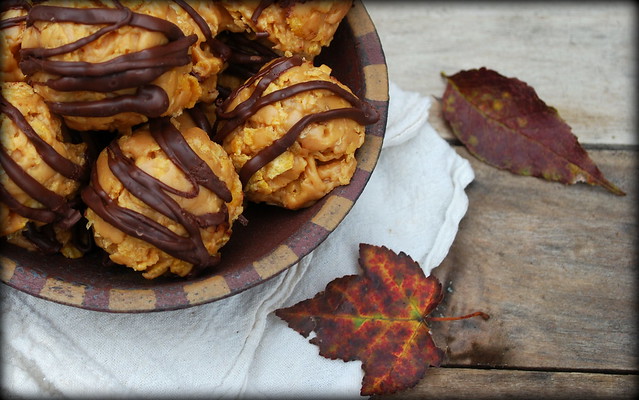
Peanut Butter Corn Flake Treats
1 cup sugar
1 cup corn syrup
1 jar (18 oz) peanut butter
6 cups corn flakes
3 oz good chocolate
Combine the sugar and the corn syrup in a medium saucepan. Place over medium high heat and stir until the mixture comes to a full boil. Remove from heat and stir in whole jar of peanut butter. Mix well.
Add the cornflakes to a large bowl and pour peanut butter mixture over the corn flakes and mix well talking care to coat all the corn flakes.
With a tablespoon of cookie scoop out and form into 1 – 2 inch balls depending on your preference, and place them on a cookie sheet lined to parchment or wax paper.
Put the chocolate in a small bowl and melt in the microwave for 30 seconds. Stir until smooth. Drizzle over cookies.
Tuesday, October 29, 2013
Lemon Ricotta Pound Cake
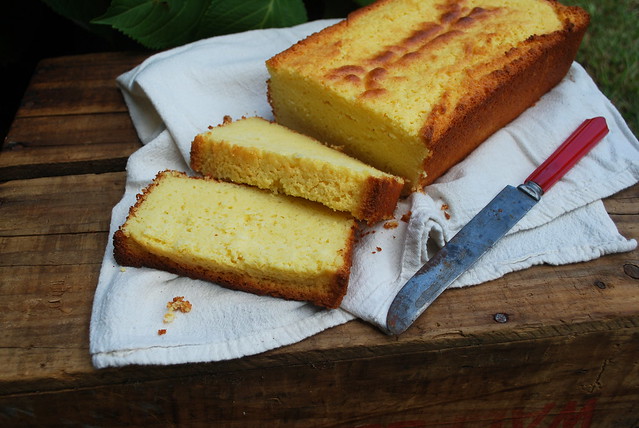
So now we are well into autumn and I couldn't be happier.
That crisp feeling in the air makes me smile. Every time I put on a pair of thick socks I get a little giddy inside. I just adore this season. I want to spend every day nestled in my little kitchen cooking and baking.
I broke out my cast iron pot and filled it with lemon, cinnamon, cloves and a splash of vanilla. I let it simmer all day. You can imagine how great it smells. It just fills the house up. It's also keep the air moist, which is a very good thing during the colder months when your heat is drying out your skin and sinuses. It's one of my most favorite things in the kitchen this time of year.
John and I are getting ready to get our Christmas crafting on. We're ordering supplies and mapping out a plan for this years project. I put a good dent in my Christmas shopping already. I shop early every year. My goal is to be done by Thanksgiving that way I can spend the weeks following crafting and cooking and baking. To me that's what the holiday season is all about. Sure it's great to give and receive gifts, but to me, the time you spend with your family and friends is really what is most important, so I try and focus on that.
I love to bake a what I call "weekend pound cake". The kind of cake you make on Saturday morning and leave on the table with the knife still on the plate so that you can just slice off a piece as you pass by. I love that pound cakes are a simple and no-frills kinda cake. Birthday cakes are just lovely, rich and decadent chocolate cakes are fine too, but I'll take a piece of pound cake over those any day of the week. Wrap me up in a blanket, hand me a book book, a cuppa tea and a piece of pound cake and I'm one happy girl.
Don't even get me started on pie.....that is a whole post by itself!
I found this recipe on a blog I love....Alexandra Cooks. I've made so many of her recipes, but this one might be my favorite of all. It was moist and tender and the little tang from the lemon just sent me over the edge.
I'm sure this would freeze well. Maybe baked in small loaf pans for Christmas presents? It's never too early to plan for Christmas! (At least not for me!)
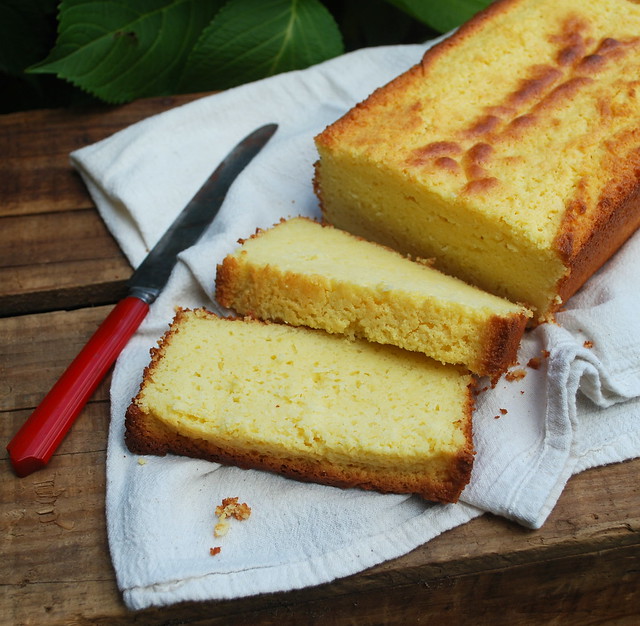
Lemon Ricotta Pound Cake
Recipe from Alexandra's Kitchen
Yield = one 9x5x3-inch loaf or three mini loaves
3/4 cup (1 1/2 sticks) unsalted butter, at room temperature
1 1/2 cups cake flour
2 teaspoons baking powder
1 teaspoon kosher salt
1 ½ cups (13 oz) whole-milk ricotta cheese
1 1/2 cups plus 1 tablespoon granulated sugar
3 large eggs
1 teaspoon pure vanilla extract
zest of 1 to 2 lemons (I used 2)
2 tablespoons freshly squeezed lemon juice
Preheat the oven to 350ºF. Grease a 9-by-5-by-3-inch loaf pan or 3 three mini loaf pans with butter (grease pans very well). In a medium bowl, combine the flour, baking powder and salt. Stir to blend.
Using a mixer, cream the butter, ricotta and granulated sugar until blended, about 3 minutes — I never really go over three minutes, and it’s ok if there are some visible pieces of butter. In other words, the batter will not look entirely smooth. With the machine running, add the eggs 1 at a time. Add the vanilla, zest and lemon juice until combined. Add the dry ingredients, a small amount at a time, until just incorporated.
Pour the batter into the prepared pan and bake until a toothpick comes out clean and the cake pulls away from the sides of the pan, 50 to 60 minutes (or 5 to 10 additional minutes — cover loosely with foil if top is getting too brown) for standard loaf pan and 40 to 45 minutes for mini pans. (Note: Times might vary dramatically depending on the type of pan you are using. If you are using Pyrex or Corningware or some other glass or ceramic loaf pan, the loaves might take an hour or an hour and 15 minutes to bake. If you notice the top browning too much before the cake is finished, cover it loosely with a sheet of aluminum foil.) Let cool in the pan for about 15 minutes, then run a knife around the edges of the pan(s) and transfer loaf/loaves to a rack to cool completely.
Tuesday, October 22, 2013
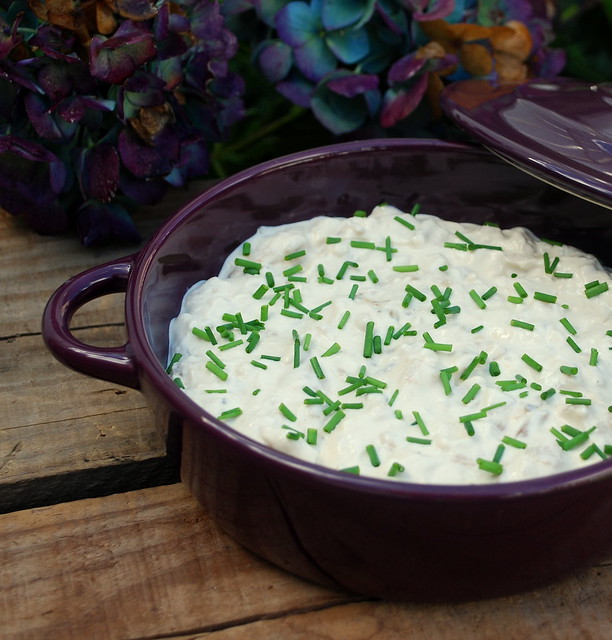
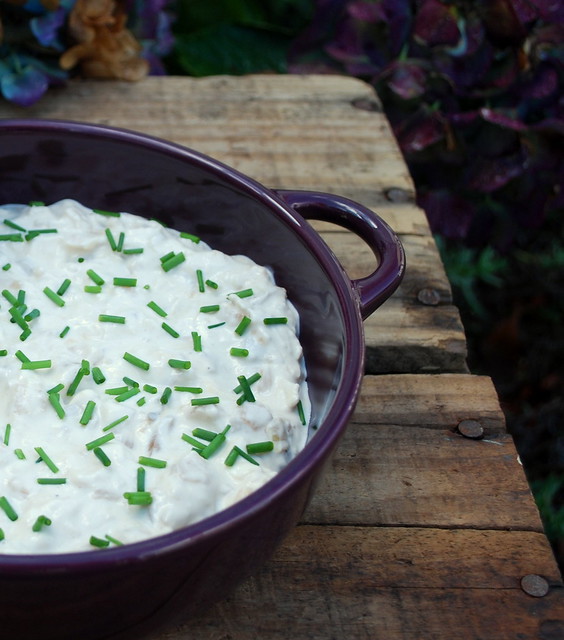
Fried Onion Dip

I don't watch too many Food Network shows. At one point, it was practically all I watched. I was taping everyone and then realized that I fast forwarded through 90% of the shows. So I stopped taping them. I still tape Ina cause I still love her simple, easy style of entertaining and the woman has some truly fantastic recipes (now if I could only handle her laugh). I love her, but that laugh irritates me. Sorry Ina.
About a month ago my Mom told me about a new show that she said she knew I would love called Heartland Table. I have to admit, I did not pay close attention and I never went to look for it on TV. A week later I was laying on the couch with a stuffy nose, freely pretty crappy, drinking my tea and channel surfing when I saw her. Amy Thielen. Rustic house, big garden, simple and easy cooking methods. I immediately clicked with her. If I had a TV show, this is what mine would be like. There is no giddy laughter, no pretentious house, no exotic ingredients, no fancy dishes. She is pure and simple and everything that should be revered about cooking.
I love this show.
I ordered her book from Amazon, The New Midwestern Table. I want to make so many of her recipes. I haven't been this excited about a cookbook in a very long time.
My friend Jenny started a Facebook page called Cooking from the New Midwestern Table. We'll be cooking and sharing Amy's recipes. If you like to join us, please head on over to the Facebook page and pick up a copy of Amy's book. It's a hefty hardcover. The kind of book you just can't wait to get dogged eared and food stained, at least that's how I like my cookbooks. Those are always the books with the best recipes in them.
The first episode I watched was called Bologna Days and featured a fantastic looking peppered pork lion, friend round bologna rings, homemade flat bread (that recipe will be coming up soon!) and this phenomenal Fried Onion Dip.
Most of you know I am an onion freak. My Maui Onion Dip is one of my most favorite dips of all time. Now I have a second.
This dip comes together so quickly. It has the deep rich flavor that you would expect from caramelizing onions for a very long time. The clarified butter and vermouth send it over the top. Don't skip those steps! Trust me!
I made this for a little get together with friends. I was thrilled that I had a smidge left the next day. I smeared it on some crusty bread and topped with some roasted chicken. Oh my. I am in love with this dip.
I'm going to make it for my son's birthday party this weekend.
I will need to double the recipe!
Fried Onion Dip
recipe from Amy Thielen - Heartland Table
4 tablespoons (1/2 stick) salted butter
1 medium sweet onion, cut into 1/2-inch-thick rings
Fine sea salt and freshly ground black pepper
1 teaspoon honey
3 cloves garlic, chopped
1/4 cup dry vermouth or dry white wine
3/4 cup sour cream
1/4 cup (2 ounces) cream cheese, at room temperature
1 tablespoon finely chopped fresh chives, plus more for garnish
Dash of cayenne pepper
First, clarify the butter so that you can fry the onions at high heat and put a very dark, almost burnt crust on them. Please don't skip this step. It does something magical to those onions and it's very easy to do.
Heat the butter in a small skillet over medium-high heat until it foams and browns. Keep an eye on it. It can go from brown to burnt in a matter of seconds. Remove from the heat. Tilt the skillet and carefully spoon off the foam, saving it in a small bowl. Pour the clear butter into another bowl, and pour the dark dregs at the bottom of the skillet into the bowl with the foam. Add the clear butter to a larger heavy skillet. I used a cast iron pan. (Discard the butter foam and dregs.)
Heat the skillet over medium-high heat. Add the onions, 3/4 teaspoon salt and 1/4 teaspoon pepper. Fry the onions, flipping them now and then, until they're dark on the edges, even black and crispy in spots, about 10 minutes. Add the honey and garlic and cook for 1 more minute. Add the vermouth, bring to a simmer and cook until the liquid thickens, about 3 minutes. Remove from the heat and let cool.
Put the sour cream and cream cheese in a mixing bowl and mix with a rubber spatula until smooth. Finely chop the fried onions on a cutting board and add them, along with their pan juices, to the cream cheese mixture. Stir in the chives. Add the cayenne and season with salt.
Transfer to a small bowl and garnish with more chives. (This can be made ahead of time and refrigerated.)
Wednesday, October 16, 2013
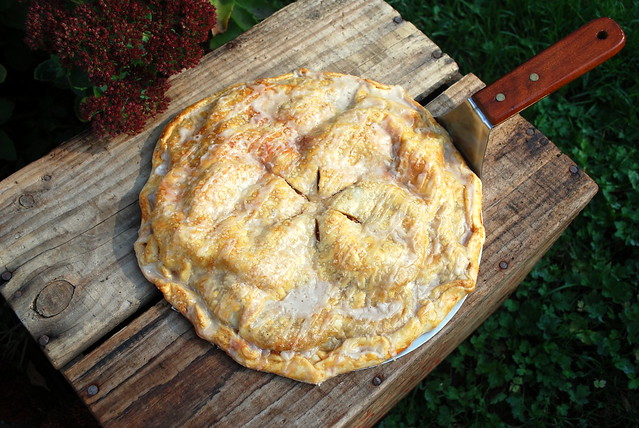
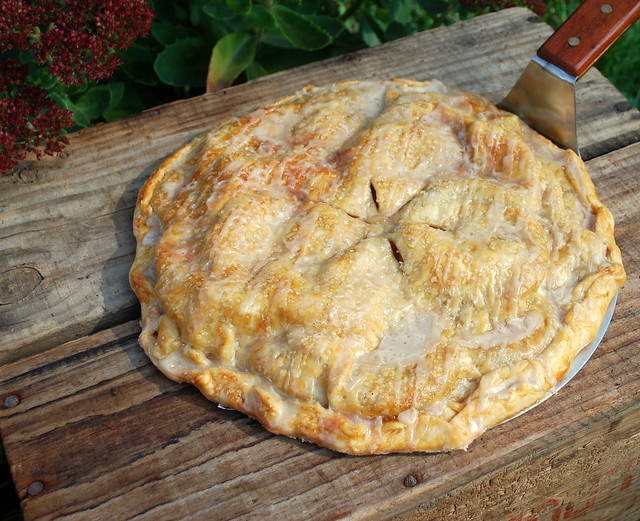
Rustic Apple Tart with Maple Glaze
Hello lovely readers. It's been a heck of a few weeks for me.
My Dad ended up in the hospital after his defibrillator shocked him out of his chair 3 times. He ended up having a procedure done, was sent home and then a day later was shocked again. They sent him to Brigham & Women's in Boston for another surgery yesterday. What a whirlwind. Here we were in Ohio on vacation getting this news. To top it all off it was his birthday when he got taken back to the hospital. He had a five hour operation yesterday and everything went wonderful! I can finally breathe. I talked to him on the phone this morning and he sounds great. Phew.
We also headed out on vacation last week. We had a wonderful time in Ohio visiting my in-laws. We went to the Football and Rock 'n Roll Hall of Fames. Amish country (love!) and a huge craft's festival in the woods. It took us over 3 hours to see everything. I bought a gorgeous primitive Christmas sign, a handmade dip bowl, and a wooden carved spreader. We also visited an Amish market. I was in heaven. It was loaded with spices and grains, all sold in bulk and they had some of the most amazing cheeses' and butters! I bought 5 pounds of the butter and lots of spices and oats, popcorn, etc. Can't wait to start cooking with it all!
I made this tart before I left on vacation. It is my Dad's favorite and since I was thinking about him constantly, I decided to make it.
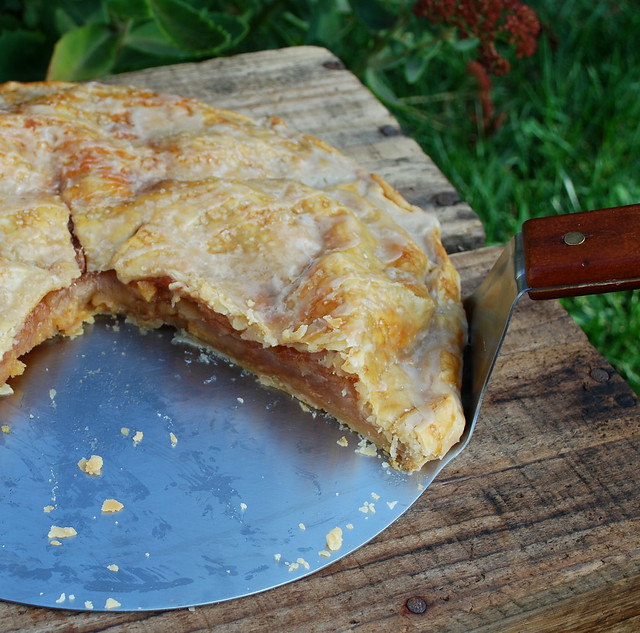
I blogged this back in 2009. I've been making it ever since. We love it so much. It's a staple every Thanksgiving. My Dad is pretty picky when it comes to desserts, but he loves this one.
It's very strudel like, no puffy apples in this.
It is made with cornflakes. Yes I said cornflakes. I know it sounds strange, but trust me, it works. You don't even know they are in there.
The maple glaze on top just brings this to a whole new level of goodness.
This is one of those recipes that I will pass down to my grand kids. I just know it.
Rustic Apple Tart with Maple Glaze
1 double pie crust - yes I used Pillsbury. No shame!
1 teaspoon flour
1 egg white, beaten
Filling
1 ½ cups corn flakes (don’t crush them!)
6 cups thinly sliced peeled apples, about 5 medium
¾ cup granulated sugar
1 teaspoon cinnamon
Glaze
½ cup powdered sugar
3 tablespoons maple syrup
Heat the oven to 350. Place one pie crust on a work surface and sprinkle with ½ teaspoon of flour. Now rub the flour all over to coat the crust. Place the crust flour side down on an ungreased cookie sheet lined with parchment.
Sprinkle the cereal over the crust to within ½ inch of the edge. Top with the apples. Yes they will be piled on there. Combine the sugar & cinnamon in a bowl and then sprinkle it over the apples.
Now take the other half of the crust and just slightly roll it out just a bit. You want it to be a little bit bigger than the bottom crust. Don’t go crazy and make it pizza pie size, just gently push it out maybe a half-inch bigger.
Place the pie crust over the top of the crust on the cookie sheet. Fold the edge of the bottom crust over the top crust, pinch the edge to seal and flute. Cut several slits in the top. Brush with egg white. I sprinkled mine with demerara sugar just before I popped it into the oven too.
Bake 45 to 55 minutes, or until crust is golden brown and apples are tender.
In a small bowl mix the glaze ingredients until smooth and drizzle over the warm tart. Serve warm or cold. If you topped it with some vanilla ice cream I wouldn’t squeal on ya either.
Tuesday, October 1, 2013
Baked Pierogi Casserole & the Giveaway Winner

Yeah it's October! My favorite month! Just had to throw that in.
Thanks for all the sweet words about my 1,000 post. Those of you who comment and take the time to share with me your thoughts and true thankfulness for this blog are what keeps me going. I know if I post 15 times a month or 5, you are always there with great enthusiasm and kindness for everything I make. That makes me happy.
We are off on vacation next week to see my in-laws in Ohio. We are so excited! We'll be headed to the Rock and Roll Hall of Fame and the Football Hall of Fame, but I'm most excited about going to Amish country and attending a huge craft fair called Shakerwoods Festival. Listen to this:
While on the grounds, bring your walking shoes for a journey down the rustic paths throughout the beautifully manicured woods, while enjoying the aroma of great country cooking over open fires and the sound of free entertainment located at two different stages throughout the woods. If rest and relaxation are your desire during the day, enjoy one of our extraordinary man-made gardens that only Shaker Woods can deliver. It's simply relaxing.
All that and over 200 crafters! I can't wait. I'm ready to pack that car with Christmas presents!
So I shall be scarce next week. I'm hoping to whip up a few apple recipes this weekend as soon as I'm done packing. Stay tuned for those as soon as I return.
I'm leaving you with this Pierogi Casserole. This is so simple. Simple, simple, simple but it's so good. It's actually one of those recipes you can cook on a weeknight after you get home from work. You can certainly use fresh homemade pierogies, but when you want to get supper on the table in a hurry, the frozen ones work.
I believe I found this recipe on Pinterest, but I didn't pin it, I just printed it and then realized that site was not listed on my print out, so I apologize if this was your original recipe whoever you are! I did tweak the amounts in this from the original a bit. There just wasn't enough sauce to cover the pierogies.
When I made this I used 1 1/2 pounds of pierogies and doubled the sauce amount. I have a crew to feed! I also fried up a bunch of onions. They were the perfect accompaniment to this dish. Our friend Mitchell was over when I made this and he declared it "DELICIOUS!". Yup he said it that loud.

Baked Pierogi Casserole
1 pound frozen pierogies (I used Mrs. T's Potato and Onion)
2-3 slices cooked bacon, crumbled
3 ounces cream cheese
1/2 cup chicken broth
1/4-1/2 cup shredded cheddar cheese
chopped green onions, optional
Preheat oven to 400 degrees. Lightly spray 13x9 baking dish with nonstick cooking spray. Arrange frozen pierogies in dish. In a saucepan, mix cream cheese and chicken broth stirring frequently until cheese is melted and smooth. Pour melted cream cheese mixture evenly over pierogies. Sprinkle evenly with cheddar cheese. I didn't measure the cheese, just cover the pierogies with it. Bake 20-25 minutes until cheese is bubbly and pierogies are warmed through.
Garnish cooked dish with crumbled bacon & chopped green onions.
*I use one and a half packages of pierogies and double the sauce when I made this. I also fried up a bunch of onions to go with it. Delicious!
Thank you for all your comments here and on Facebook too. I picked one name from the blog and one name from Facebook, put the two names in a basket and chose one. The winner is:
GIVEAWAY WINNER! - MARYANNE SAWYER!
I can't believe Maryanne is from Rhode Island. Honestly I didn't plan that!! Congrats Maryanne! You'll be receiving Kendra's cookbook in the mail sent directly from her and the dish from me! Enjoy!
Friday, September 27, 2013
My 1,000th post - Pumpkin Gingersnaps
First of all I just wanted to point out that this is my 1,000th post. Wow. Well for me it's a wow. My first post was way back in 2007 and the first recipe I posted was for Honey Wheat Bread. Can I just say my blog looked pitiful and my photography was horrendous. Geesh. I have come a long way. Hitting this milestone kind of ties into what I'm going to talk about next.
You hear people talk about having a mid-life crisis right? Or you hear stories about how so-and-so left so-and-so and took up with a younger partner, or how the old guy down the street suddenly decided to buy a sports car that he looks ridiculous in. I never really thought that much about the whole mid-life crisis at all, up until now and I can't even say that it describes what I'm feeling. I'm almost 50 and I've been at the same company for 30 years and I have to admit, I'm growing a little tired of it all. I'm having thoughts of leaving and living the life I want to live. Isn't that what everyone wants?
There are so many things I want to do. I have made so many lists and I have to tell ya, I'm not crossing a lot off them. Everything is crammed into vacation days or long weekends. I'm not feeling at peace with myself at all. I've got a difficult new co-worker that is really throwing a monkey wrench into what I used to call I job I loved. I don't love it anymore.
I've gone back and forth with thoughts of monetizing the blog. It's really not something I want to do. I'm such a minimalist when it comes to this kind of stuff. I don't want it to take up too much of my time. I don't like the look of all the ads. I could go on and on, and I have in the past, but I think I might have to give it a go and see what happens. Now if I only had the time to look into it more! See what I mean??
So I'm trying to work things out in my head. Hang in there with me. Meanwhile, I'm still making cookies. Phenomenal cookies too. Baking always brings me a certain sense of calm and peace. Cookies in particular are always a joy for me to make. I love mixing all the ingredients in a big bowl, I love scooping the dough out, I love rolling little balls of goodness in sugar, I love how the house smells and I love giving someone a warm cookie straight from the rack.
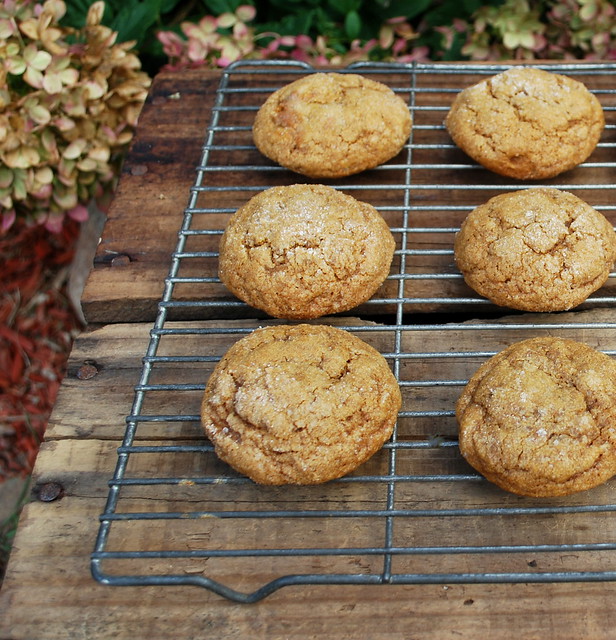
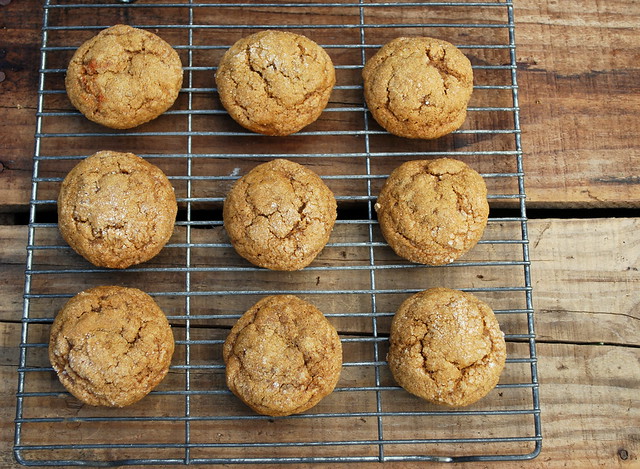
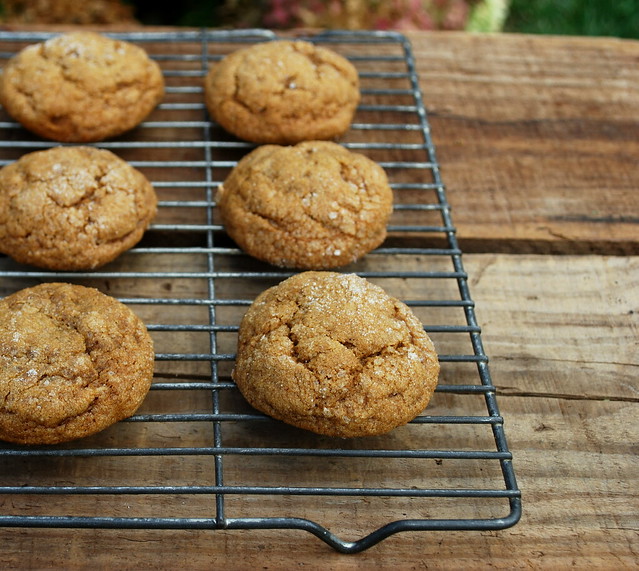
I love gingersnaps. The pumpkin in these just takes it to another level. They aren't too pumpkiny and they have just the right amount of molasses kick. This is a soft gingersnap. I think this one is making it onto my Christmas cookie list.
Pumpkin Gingersnap Cookies
recipe from Two Peas in Their Pod
½ cup butter (1 stick) at room temperature
1 cup granulated sugar, plus more for rolling the cookies
½ cup pumpkin
¼ cup molasses
1 large egg
1 teaspoon vanilla extract
2 ½ cups all-purpose flour
2 teaspoons baking soda
2 teaspoons cinnamon
1 ½ teaspoons ground ginger
1 teaspoon ground cloves
½ teaspoon salt
In the bowl of a stand mixer, beat the butter and sugar together until creamy and smooth. Add in the pumpkin, molasses, egg and vanilla. Mix until combined.
In a medium bowl, whisk together the flour, baking soda, spices and salt. Add the dry ingredients to the wet ingredients and mix until just combined. Refrigerate the dough for a least 1 hours or up to several days.
When you are ready to bake, preheat the oven to 350. Line a baking sheet with parchment. Place some sugar in a small bowl. Roll tablespoon-sized balls of dough in the sugar until well coated. Place on baking sheet about 2 inches apart. Bake for 10 – 12 minutes or until cookies look cracked and set at edges. The cookies will still be soft. Let them cool on the baking sheet for 2 – 3 minutes then transfer to a wire rack to cool completely.
Tuesday, September 24, 2013
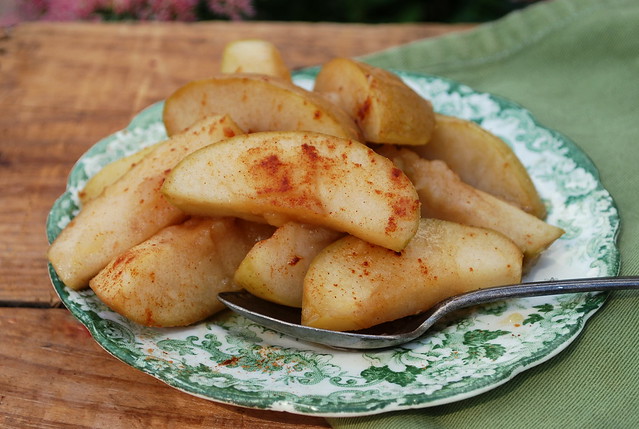
Country Breakfast Apples & a Fall Giveaway
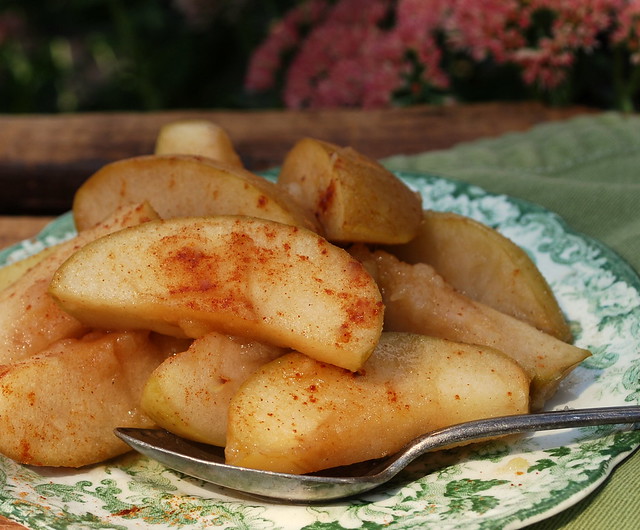
Fall is officially here, and I cannot contain my excitement any longer!!
This is my absolute favorite time of the year. I get giddy with thoughts of all the pumpkin and apple recipes I can make. Next week we'll head out for our annual apple picking day and then I'll spend the rest of that weekend canning up apple sauce and apple butter.
I can't wait to pull down all my fall decorations from the attic and hang my comfy sweaters back in the closet. Don't even get me started on Halloween!
So in honor of my favorite season I'm having a little giveaway.
Fall is also slow cooker season. What's better than filling up the crock up in the morning and uncovering something delicious and ready to eat at the end of the day?
Kendra Baily Morris sent me her cookbook The Southern Slow Cooker: Big-Flavor, Low-Fuss Recipes for Comfort Food Classics. It's loaded with so many delicious slow cooker recipes! She kindly offered up another book to one of my followers. You'll have your slow cooker cooking away all fall and winter long!

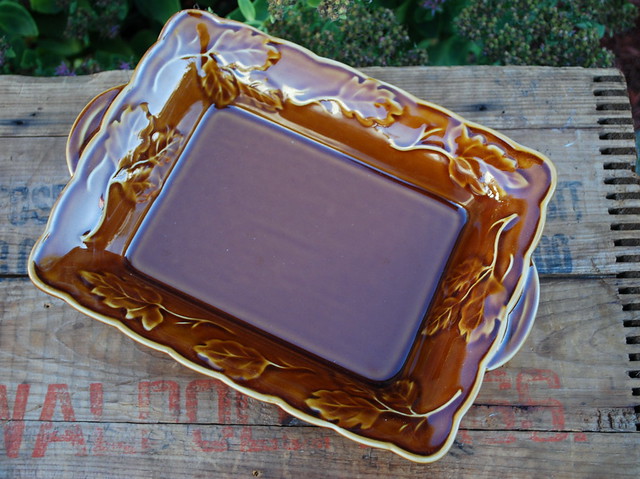
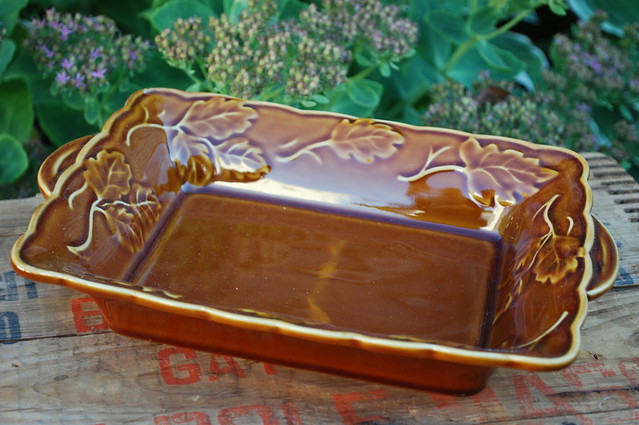
I also picked up this beautiful serving dish that just screams fall. Can't you see this on your Thanksgiving table? Details to follow below.
I couldn't look through this cookbook and not make something from it. I chose to make the Country Breakfast Apples. They were so delicious. They aren't just for breakfast either. I served them with a nice country ham that I baked over the weekend. I could become addicted to them for sure. I love the fact that you don't have to peel them either. Such a time saver.
So, how can you enter to win?? One lucky winner will win the cookbook and the serving dish. Here's what to do:
Just let me know what is your most favorite thing about fall?
If you don't have a blog, please leave me email address to contact you (no email and I'll move on to the next name).
There are three ways to enter: (1) leave a comment on the blog (2) If you haven't already, go “like” The Cutting Edge of Ordinary on Facebook or (3) Already a fan? Just leave a comment here or on Facebook to let me know! Facebook comments will count as entries.
Giveaway ends on midnight Sunday, September 29th eastern standard time. Good Luck!
Country Breakfast Apples
recipe from The Southern Slow Cooker: Big-Flavor, Low-Fuss Recipes for Comfort Food Classics
Country Breakfast Apples
2 cups water
2 tablespoons fresh lemon juice
6 cups unpeeled, cubed yellow or green apples (1 ½ inch cubes) * see note
Sugar
In a large bowl combine the 2 cups of water and lemon juice. Add the apples to the water mixture and toss to coat. Drain the apples, reserving 1 cup of the mixture.
Spray the inside of the slow cooker with cooking spray. Add the apples, pour over the reserved cup of lemon water and gently stir. Cover and cook for 4 – 6 hours on low, or until the apples are tender.
During the last 30 minutes, add sugar to taste. I added cinnamon at this point too. Cover and continue to cook until the sugar has dissolved. Serve warm straight from the slow cooker. The cooked apples will keep up to 2 weeks in the refrigerator.
* I sliced my apples instead of using chunks. Either way, they are delicious.
Thursday, September 19, 2013
Sweet Bacon Pork Shots
Before I even begin to talk about this recipe I have to tell you that my husband was in absolute HEAVEN when I made these. He is a kielbasa lover and he is a bacon lover so these were just bliss to him.
I had seen these on a BBQ forum and showed him a picture. The first words out of his mouth were "OMG you have to make these for me". He then proceeded to ask me about them for the next 2 weeks. Yeah I kinda had him waiting a bit. I even bought the kielbasa and defrosted the bacon from the freezer and had them both sitting in the fridge, so every time he opened the door he's ask when I was making them. That was kinda mean.
Well Labor day rolled around and I had already planned food so he had to wait until the weekend after. That next Saturday I looked up a few different recipes for them and then decided to settle on my own variation.

I cut the kielbasa in 1 inch chunks, wrapped them in bacon so that they top of the bacon was taller than the piece of kielbasa. That gives you a little space to fill it with goodness. Secured it with a toothpick, filled it with a brown sugar and chili powder mixture and baked them until the bacon was brown and crispy.
I used the same combination of brown sugar and chili powder that I use on my Sweet Bacon Chicken Wraps and Sweet Bacon Tater Tots. These were FANTASTIC!! So very, very good. They were gone in a flash too. Perfect football food too!
I'm guessing the name Pork Shots was used because they kinda look like a little porky shot glass??? I'm not sure on that one. They also referred to these as Pork Candy. Either one works for us! They are porky goodness at it's best!
John always says "everything is better with bacon". I'm beginning to think he's right.
MAKE THESE!
Sweet Bacon Pork Shots
adapted from a recipe at Smoking Meat Forums
1 pound bacon
2 packages of kielbasa cut into 1 inch pieces
2/3 cup packed brown sugar
2 tablespoons chili powder
Preheat oven to 425 degrees. Line a cookie sheet with foil and place a cooling rack on top of the pan. Spray the rack with cooking spray. This will allow the bacon to crisp on all sides and let any grease drip out onto the pan.
Cut the kielbasa into 1 inch pieces. Cut each slice of bacon in half. I used cutlery scissors and cut the whole package in half at once. Wrap each piece of bacon around the kielbasa, leaving a little room at the top so it can be filled. Secure with a toothpick. Place on the baking sheet.
Combine the brown sugar and chili powder and mix well. Place about a half a teaspoon on the top of each piece of kielbasa. The next time I make these I am going to double the brown sugar chili mixture and roll them in it and then top them with the same mixture. We love the taste of that combo.
Bake for 20 - 25 minutes or until the bacon is brown and crispy. Allow to cool a few minutes or you will burn your mouth. Trust us, we learned the hard way!
Monday, September 9, 2013
Chocolate Chip Pumpkin Crisp
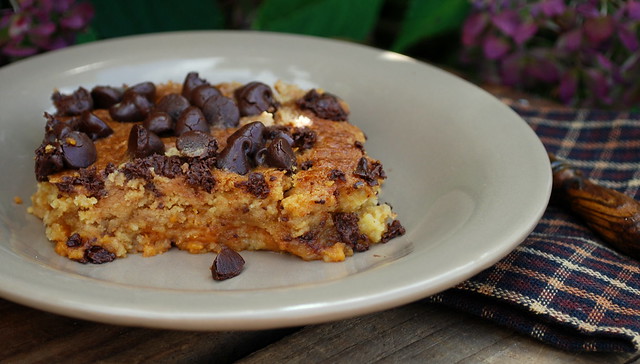
Hello All!
Sorry I was gone so long. Life just catches up with you sometimes and you need a little break, so I took one. I was still cooking and baking, just nothing that I hadn't blogged before or anything that would really wow you all. I'm sure my chicken on the grill would have sent you all into a tailspin, lol.
I've been chilling out and enjoying life. We've been having friends over for dinner, spending time by the fire pit and doing a lot of grilling too. My hubby made my mother-in-laws famous baby back ribs for Labor Day. They are fall off the bone fantastic. I'm thinking I should blog those one of these days.
So my oldest is now a college student and my husband is taking a class at the same college. Tuesday and Wednesday nights I'll be without one of my men around the dinner table. It's going to be strange. I don't know where all the years have gone. It seems like just yesterday I was getting him ready for pre-school and now he's in college. Slow down life.
I'm thrilled beyond belief that September is here! I feel like my cooking comes alive in the fall. I'm all about soups and stews and casserole and hearty breakfasts. I've been hoarding some great recipes and I can't wait to share them.
Here's my first one. Chocolate Chip Pumpkin Crisp. This is a variation on a pumpkin dump cake. The original recipe called for pecans and you can certainly use them if you love pecans, but my gang isn't fond of them so I chose to use chocolate chips instead. I love the combination of pumpkin and chocolate. It worked perfectly in this recipe.
The bottom layer is the consistency of pumpkin pie and the top layer is crunchy and chocolaty. It's not cake-like, it truly is crisp-like. So don't keep baking thinking that the bottom layer will firm up. It's supposed to be mushy (and delicious!).
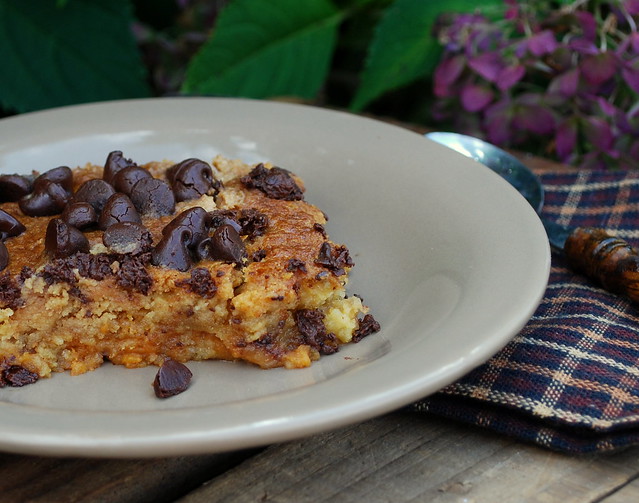
Chocolate Chip Pumpkin Crisp
adapted from a recipe at Rachel Schultz
15 ounce can pumpkin
1 cup evaporated milk
1 cup sugar
1 teaspoon vanilla
1/2 teaspoon cinnamon
1/2 teaspoon nutmeg
1 package butter yellow cake mix (I used butter)
1 cup semi-sweet chocolate chips
1 cup butter (2 sticks), melted
Preheat oven to 350 degrees. Combine pumpkin, evaporated milk, sugar, vanilla, cinnamon, and nutmeg.
Grease a 9x13 dish. Pour the mixture in and then sprinkle the cake mix over pumpkin mixture in an even layer. Sprinkle the chocolate chips over the cake mix and then pour the melted butter evenly over the top, moistening the cake mix.
Bake for 70 to 8- minutes or until golden brown. Mine only took 70 minutes.You can serve this with freshly whipped cream, but we ate it as is. Delicious!
Friday, August 23, 2013
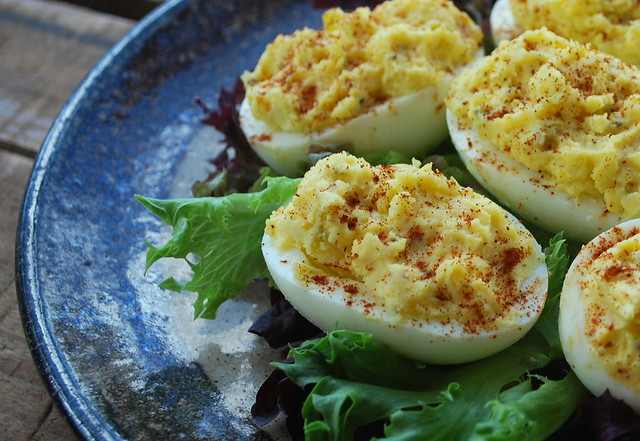
Southern Style Deviled Eggs
I know summer is winding down and for lots of folks I know that makes them happy because it means that their kids are heading back to school but I'm not happy. I love having my kids home. I always wished I could have been a stay at home Mom. I think I would have been pretty good at it, but I've been in my current job for 30 years now. Yes, 30 years, so I guess I mine as well stick it out for a few more and then I'll retire (hopefully). The kids here in Rhode Island go back to school August 27th. It's too soon!
My oldest son is starting college! Yikes. It will just make me feel strange when someone asks me what grades they are going in and I'll have to I say...."one in college and one Junior". Freaky! So the only summer party left here to celebrate is Labor Day and what's a party without deviled eggs? Not a good one according to my deviled egg addicted hubby.
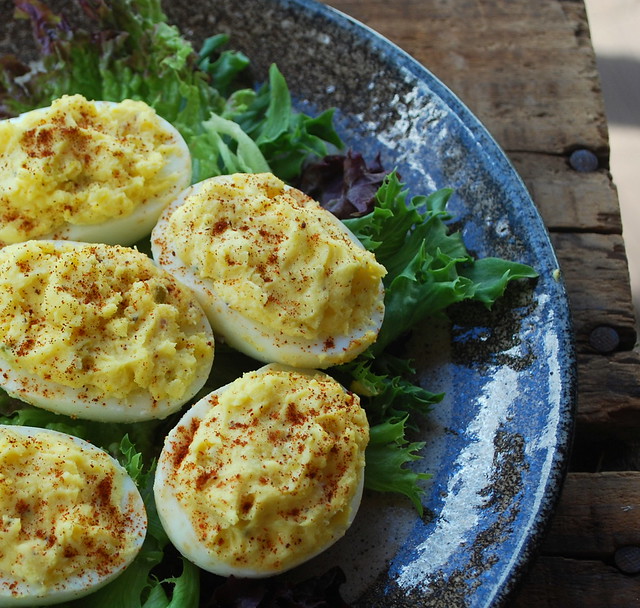
I was trying to mix things up a bit so I tried a new deviled egg recipe. *Gasp*. Yes I did. I saw it on this new show I've been taping and watching called "My Family Recipe Rocks" on the Live Well Network. Joey Fatone hosts it. Now I knew who Joey Fatone was cause he was in of one of my most favorite movies "My Big Fat Greek Wedding", and I knew he was in a boy band, I just didn't know which one (googled and discovered it was 'N Synch), but anyway....he goes around the country visiting real people in their kitchen making their family recipes with them and I have to tell you, I have about 8 recipes that I want to make from these shows.
This deviled egg recipe was one was the first. I saw them being made and I have to say, I was watching the TV saying "what??" as he added ingredients. Melted butter, sugar? Really? I had to make them. I just had too! Who puts butter and sugar in deviled eggs?
The result....pretty good. Do I like them as much as my deviled egg recipe? Maybe not, but they were tasty. Yes there was a little hint of sweetness, but it wasn't overpowering. The texture was a little different too, I know it sounds strange but it was softer.
So if you want to try a different kind of deviled egg for a change, give these a try.
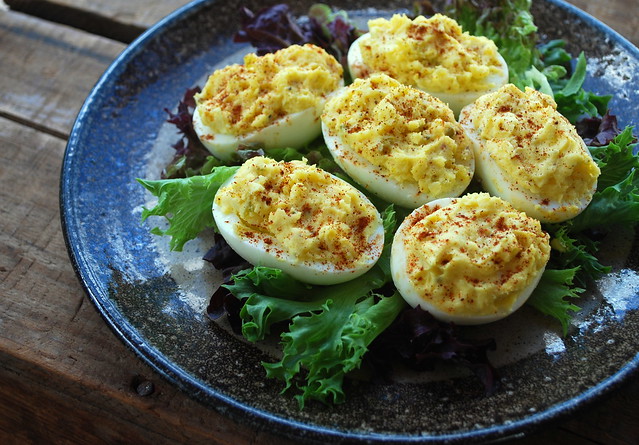
Southern Style Deviled Eggs
recipe from My Family Recipe Rocks - Nick Sanders
1 dozen large hard boiled eggs
3/4 stick butter, melted
1 teaspoon salt
1 teaspoon fresh ground pepper
2 tablespoons sweet pickle relish, drained (I used dill relish)
1 tablespoon finely grated fresh onion
2 tablespoons sugar
1/2 tablespoon mayo
1 small squirt yellow mustard
Cut hard boiled eggs in half across long side of egg. Remove yokes and place them in medium mixing bowl. Using dinner fork, break up yolks and mash to a fine consistency. Add salt, pepper and onion to eggs and mix. Add butter to egg mixture and stir to mix well. Add pickle relish and sugar and stir well. Add mayo and mustard. Fill eggs and serve. Sprinkle with paprika (cause that's what I always do!)
Subscribe to:
Posts (Atom)